FastPitch 2
模型描述
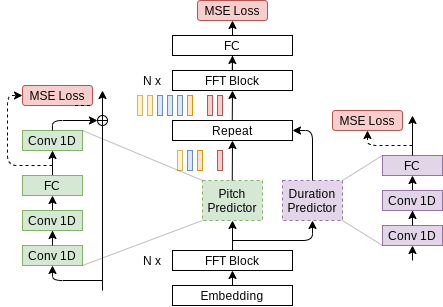
本筆記本演示了 FastPitch 模型的 PyTorch 實現,該模型在 FastPitch 論文中有所描述。FastPitch 模型從原始輸入文字生成梅爾譜圖並預測音高輪廓。在 1.1 版本中,它不需要任何預訓練的對齊模型來引導。為了獲得音訊波形,我們需要第二個模型從生成的梅爾譜圖生成它。在本筆記本中,我們使用 HiFi-GAN 模型進行第二步。
FastPitch 模型基於 FastSpeech 模型。FastPitch 與 FastSpeech 之間的主要區別如下:
- 不依賴外部對齊器(Transformer TTS、Tacotron 2);在 1.1 版本中,FastPitch 像 One TTS Alignment To Rule Them All 中一樣,自行將音訊與轉錄文字對齊。
- FastPitch 明確學習預測音高輪廓,
- 音高條件消除了刺耳的偽影並提供了更快的收斂速度,
- 無需使用教師模型蒸餾梅爾譜圖,
- 具備訓練多說話人模型的能力。
模型架構

示例
在下面的示例中
- 預訓練的 FastPitch 和 HiFiGAN 模型從 torch.hub 載入
- 給定輸入文字的張量表示(“Say this smoothly to prove you are not a robot.”),FastPitch 生成梅爾譜圖
- HiFiGAN 根據梅爾譜圖生成聲音
- 輸出聲音儲存為“audio.wav”檔案
要執行該示例,您需要安裝一些額外的 Python 包。這些包用於文字和音訊的預處理,以及顯示和輸入/輸出處理。最後,為了提高 FastPitch 模型的效能,我們下載了 CMU 發音詞典。
apt-get update
apt-get install -y libsndfile1 wget
pip install numpy scipy librosa unidecode inflect librosa matplotlib==3.6.3
wget https://raw.githubusercontent.com/NVIDIA/NeMo/263a30be71e859cee330e5925332009da3e5efbc/scripts/tts_dataset_files/heteronyms-052722 -qO heteronyms
wget https://raw.githubusercontent.com/NVIDIA/NeMo/263a30be71e859cee330e5925332009da3e5efbc/scripts/tts_dataset_files/cmudict-0.7b_nv22.08 -qO cmudict-0.7b
import torch
import matplotlib.pyplot as plt
from IPython.display import Audio
import warnings
warnings.filterwarnings('ignore')

device = torch.device("cuda") if torch.cuda.is_available() else torch.device("cpu")
print(f'Using {device} for inference')
下載並設定 FastPitch 生成器模型。
fastpitch, generator_train_setup = torch.hub.load('NVIDIA/DeepLearningExamples:torchhub', 'nvidia_fastpitch')
下載並設定聲碼器和去噪器模型。
hifigan, vocoder_train_setup, denoiser = torch.hub.load('NVIDIA/DeepLearningExamples:torchhub', 'nvidia_hifigan')
驗證生成器和聲碼器模型在輸入引數上是否一致。
CHECKPOINT_SPECIFIC_ARGS = [
    'sampling_rate', 'hop_length', 'win_length', 'p_arpabet', 'text_cleaners',
    'symbol_set', 'max_wav_value', 'prepend_space_to_text',
    'append_space_to_text']

for k in CHECKPOINT_SPECIFIC_ARGS:

    v1 = generator_train_setup.get(k, None)
    v2 = vocoder_train_setup.get(k, None)

    assert v1 is None or v2 is None or v1 == v2, \
        f'{k} mismatch in spectrogram generator and vocoder'
將所有模型放在可用裝置上。
fastpitch.to(device)
hifigan.to(device)
denoiser.to(device)
載入文字處理器。
tp = torch.hub.load('NVIDIA/DeepLearningExamples:torchhub', 'nvidia_textprocessing_utils', cmudict_path="cmudict-0.7b", heteronyms_path="heteronyms")
設定要合成的文字,準備輸入並設定附加的生成引數。
text = "Say this smoothly, to prove you are not a robot."
batches = tp.prepare_input_sequence([text], batch_size=1)
gen_kw = {'pace': 1.0,
          'speaker': 0,
          'pitch_tgt': None,
          'pitch_transform': None}
denoising_strength = 0.005
for batch in batches:
    with torch.no_grad():
        mel, mel_lens, *_ = fastpitch(batch['text'].to(device), **gen_kw)
        audios = hifigan(mel).float()
        audios = denoiser(audios.squeeze(1), denoising_strength)
        audios = audios.squeeze(1) * vocoder_train_setup['max_wav_value']
繪製中間頻譜圖。
plt.figure(figsize=(10,12))
res_mel = mel[0].detach().cpu().numpy()
plt.imshow(res_mel, origin='lower')
plt.xlabel('time')
plt.ylabel('frequency')
_=plt.title('Spectrogram')
合成音訊。
audio_numpy = audios[0].cpu().numpy()
Audio(audio_numpy, rate=22050)
將音訊寫入 wav 檔案。
from scipy.io.wavfile import write
write("audio.wav", vocoder_train_setup['sampling_rate'], audio_numpy)
詳情
有關模型輸入和輸出、訓練方法、推理和效能的詳細資訊,請訪問: github 和/或 NGC