在 iOS 上使用 ExecuTorch
ExecuTorch 透過 Objective-C、Swift 和 C++ 支援 iOS 和 macOS。ExecuTorch 還提供後端,可利用 Core ML 和 Metal Performance Shaders (MPS) 在 Apple 平臺上進行硬體加速執行。
整合
適用於 iOS 和 macOS 的 ExecuTorch 執行時以預構建的 .xcframework 二進位制目標集合形式分發。這些目標與 iOS 和 macOS 裝置以及模擬器相容,並提供釋出 (release) 和除錯 (debug) 模式。
executorch- 主執行時元件backend_coreml- Core ML 後端backend_mps- MPS 後端backend_xnnpack- XNNPACK 後端kernels_custom- 適用於 LLMs 的自定義核心kernels_optimized- 最佳化核心kernels_portable- 可移植核心(用作參考的樸素實現)kernels_quantized- 量化核心
將您的二進位制檔案與 ExecuTorch 執行時以及匯出的 ML 模型使用的任何後端或核心連結。建議將核心執行時連結到直接使用 ExecuTorch 的元件,並將核心和後端連結到主應用目標。
注意:要訪問日誌,請連結 ExecuTorch 執行時的 Debug 構建版本,即 executorch_debug 框架。為了獲得最佳效能,請始終連結交付件的 Release 版本(不帶 _debug 字尾的版本),這些版本已移除所有日誌開銷。
Swift Package Manager
預構建的 ExecuTorch 執行時、後端和核心可透過 Swift PM 包獲取。
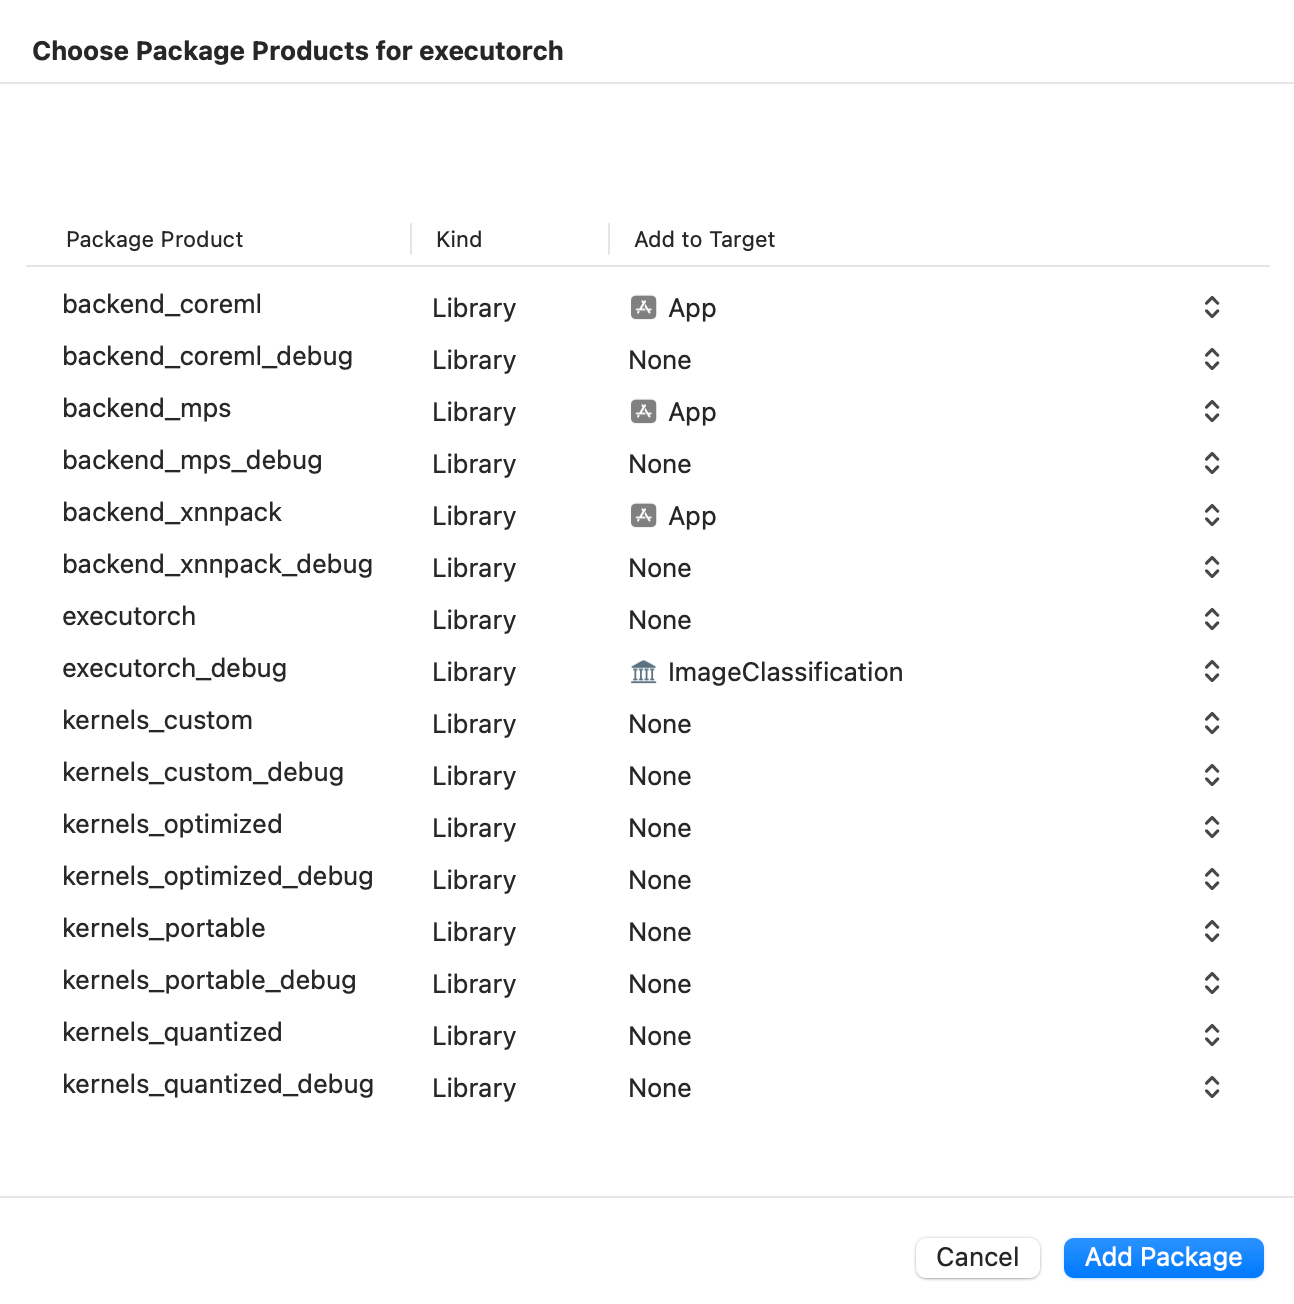
Xcode
在 Xcode 中,前往 檔案 > 新增包依賴項。將 ExecuTorch 倉庫的 URL 貼上到搜尋欄中並選擇它。確保將分支名稱更改為所需 ExecuTorch 版本,格式為“swiftpm-

然後選擇哪個 ExecuTorch 框架應連結到哪個目標。
點選下方截圖觀看演示影片,瞭解如何在 iOS 上新增軟體包並執行簡單的 ExecuTorch 模型。
命令列介面 (CLI)
像這樣將 ExecuTorch 的軟體包和目標依賴項新增到您的軟體包檔案中
// swift-tools-version:5.9
import PackageDescription

let package = Package(
  name: "YourPackageName",
  platforms: [
    .iOS(.v17),
    .macOS(.v10_15),
  ],
  products: [
    .library(name: "YourPackageName", targets: ["YourTargetName"]),
  ],
  dependencies: [
    // Use "swiftpm-<version>.<year_month_day>" branch name for a nightly build.
    .package(url: "https://github.com/pytorch/executorch.git", branch: "swiftpm-0.6.0")
  ],
  targets: [
    .target(
      name: "YourTargetName",
      dependencies: [
        .product(name: "executorch", package: "executorch"),
        .product(name: "backend_xnnpack", package: "executorch"),
        .product(name: "kernels_portable", package: "executorch"),
        // Add other backends and kernels as needed.
      ]),
  ]
)
然後檢查一切是否正常工作
cd path/to/your/package

swift package resolve

# or just build it
swift build
從原始碼構建
整合 ExecuTorch 執行時的另一種方法是在本地從原始碼構建所需的元件並連結到它們。這在自定義執行時時非常有用。
安裝 Xcode 15+ 和 Command Line Tools
xcode-select --install
克隆 ExecuTorch
git clone -b release/0.6 https://github.com/pytorch/executorch.git --depth 1 --recurse-submodules --shallow-submodules && cd executorch
設定 Python 3.10+ 並激活虛擬環境
python3 -m venv .venv && source .venv/bin/activate && pip install --upgrade pip
./install_requirements.sh

# CoreML-only requirements:
./backends/apple/coreml/scripts/install_requirements.sh

# MPS-only requirements:
./backends/apple/mps/install_requirements.sh
安裝 CMake
從 CMake 網站下載 macOS 二進位制分發版本,開啟 .dmg 檔案,將 CMake.app 移動到 /Applications 目錄,然後執行以下命令安裝 CMake 命令列工具
sudo /Applications/CMake.app/Contents/bin/cmake-gui --install
使用提供的指令碼構建 .xcframeworks
./scripts/build_apple_frameworks.sh --help
例如,以下命令將為 Apple 平臺構建 ExecuTorch 執行時以及所有可用的核心和後端,包括 Release 和 Debug 模式
./scripts/build_apple_frameworks.sh --Release --Debug --coreml --mps --xnnpack --custom --optimized --portable --quantized
構建成功完成後,生成的框架可在 cmake-out 目錄中找到。將它們複製到您的專案中並連結到您的目標。
連結
ExecuTorch 在應用啟動期間透過在靜態字典中註冊後端和核心(運算子)來初始化它們。如果在執行時遇到“未註冊核心”或“未註冊後端”等錯誤,您可能需要顯式地強制載入某些元件。在您的 Xcode 構建配置中使用 -all_load 或 -force_load 連結器標誌,以確保元件儘早註冊。
以下是一個 Xcode 配置檔案 (.xcconfig) 的示例
ET_PLATFORM[sdk=iphonesimulator*] = simulator
ET_PLATFORM[sdk=iphoneos*] = ios
ET_PLATFORM[sdk=macos*] = macos

OTHER_LDFLAGS = $(inherited) \
    -force_load $(BUILT_PRODUCTS_DIR)/libexecutorch_debug_$(ET_PLATFORM).a \
    -force_load $(BUILT_PRODUCTS_DIR)/libbackend_coreml_$(ET_PLATFORM).a \
    -force_load $(BUILT_PRODUCTS_DIR)/libbackend_mps_$(ET_PLATFORM).a \
    -force_load $(BUILT_PRODUCTS_DIR)/libbackend_xnnpack_$(ET_PLATFORM).a \
    -force_load $(BUILT_PRODUCTS_DIR)/libkernels_optimized_$(ET_PLATFORM).a \
    -force_load $(BUILT_PRODUCTS_DIR)/libkernels_quantized_$(ET_PLATFORM).a
注意:在上面的示例中,我們連結到 ExecuTorch 執行時的 Debug 版本 (libexecutorch_debug) 以保留日誌。通常,這不會對效能產生太大影響。然而,請記住連結到執行時的 release 版本 (libexecutorch) 以獲得最佳效能且不包含日誌。
您可以在 Xcode 中將此類配置檔案分配給您的目標
將
.xcconfig檔案新增到您的專案中。導航到專案的 Info 選項卡。
在 Release(或 Debug)模式的構建配置中選擇配置檔案。
執行時 API
ExecuTorch 提供原生的 Objective-C API,可自動橋接到 Swift,用於與執行時互動。這些 API 是 extension/tensor 和 extension/module 中核心 C++ 元件的封裝,為 Apple 平臺開發者提供更符合習慣的體驗。
注意:這些 Objective-C/Swift API 目前處於實驗階段,可能會發生變化。
匯入
一旦連結到 executorch 框架,您就可以匯入必要的元件。
Objective-C (Objective-C++)
// Import the main umbrella header for Module/Tensor/Value wrappers.
#import <ExecuTorch/ExecuTorch.h>

// If using C++ directly alongside Objective-C++, you might still need C++ headers.
#import <executorch/extension/module/module.h>
#import <executorch/extension/tensor/tensor.h>
Swift
import ExecuTorch
示例
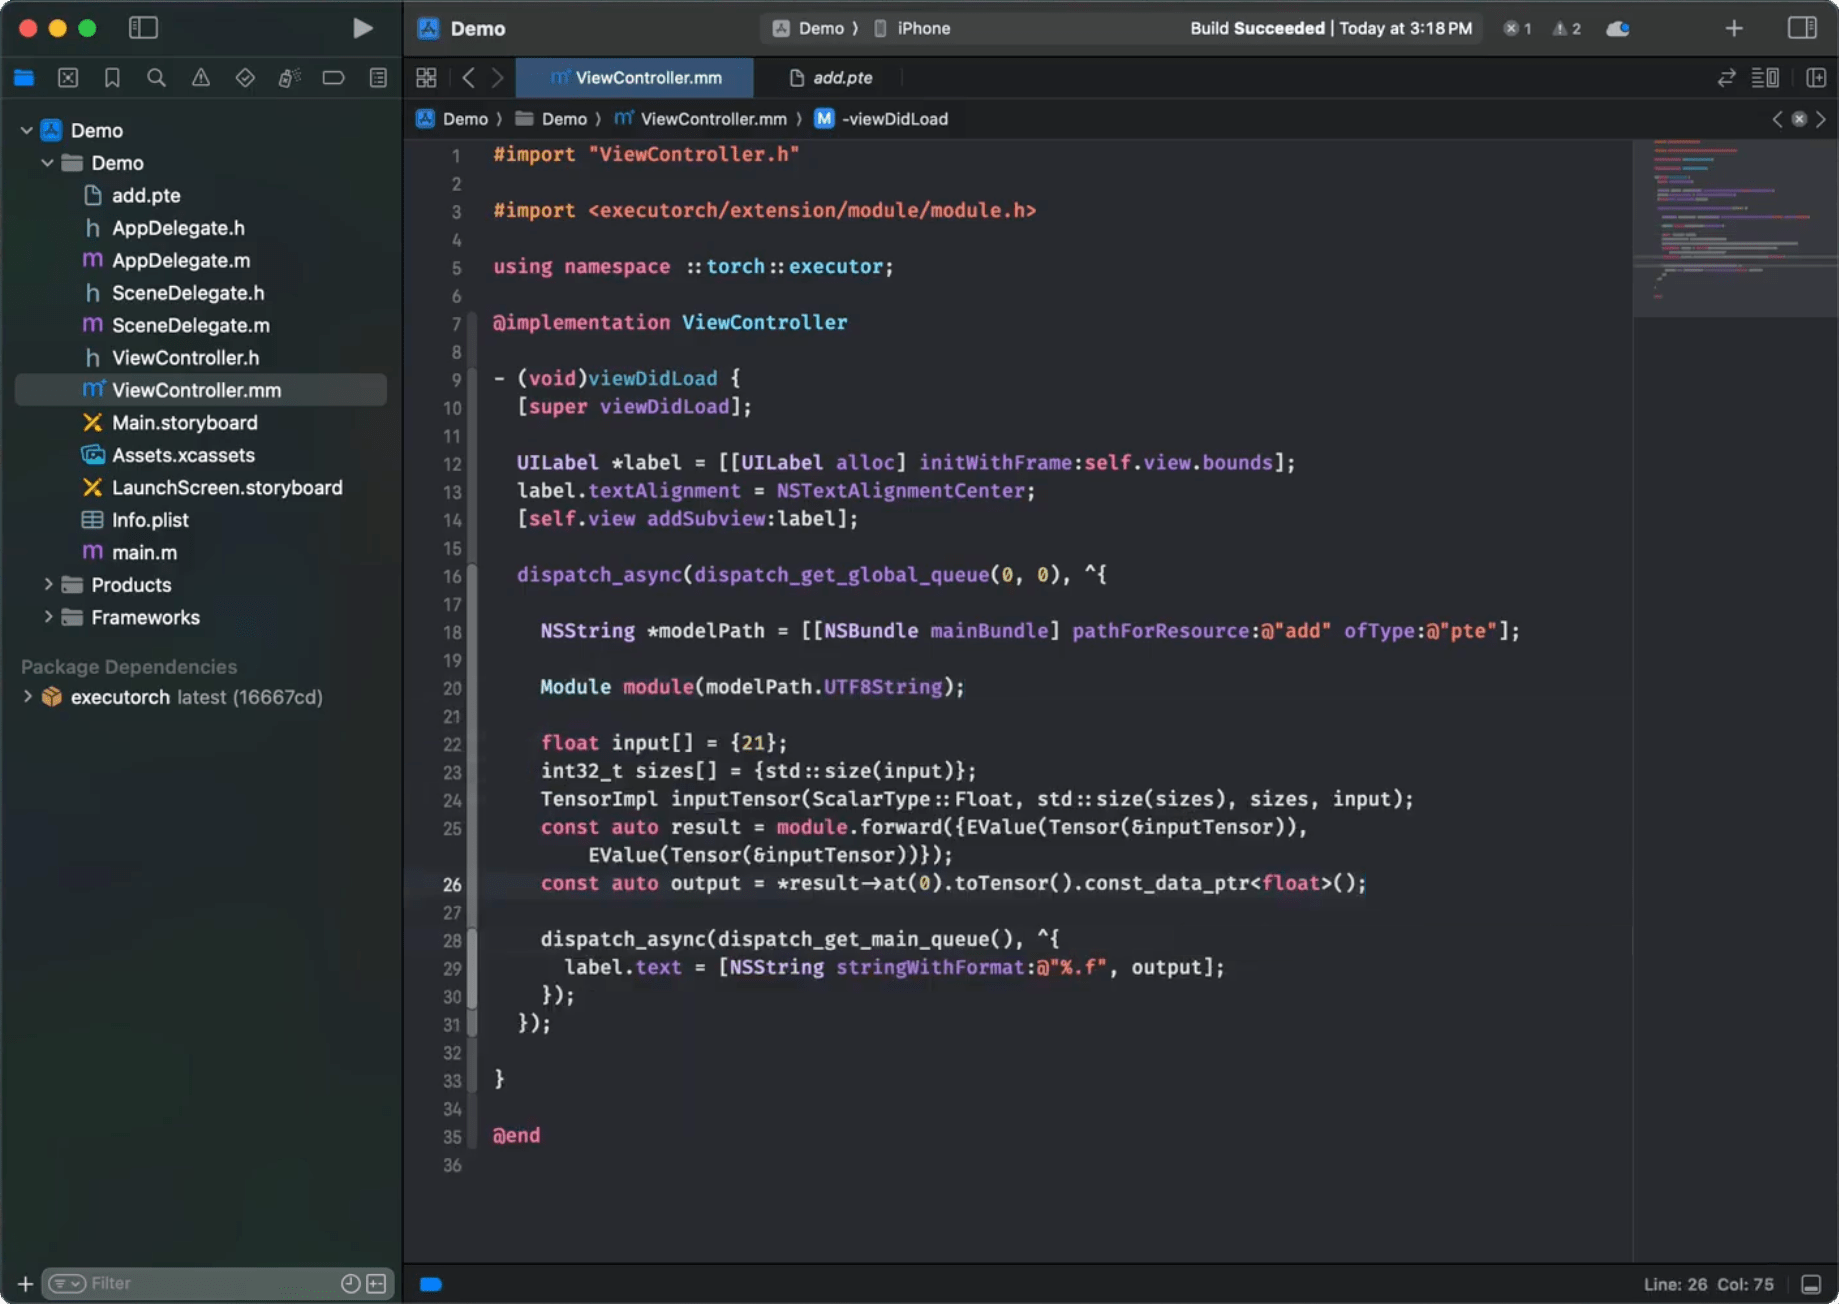
這裡提供一個簡潔的示例,演示如何使用 Objective-C 和 Swift API 載入模型、準備輸入、執行推理和處理輸出。假設您有一個 MobileNet v3 模型 (mv3.pte),它接受一個 [1, 3, 224, 224] 浮點 tensor 作為輸入並輸出 logits。
Objective-C
NSString *modelPath = [[NSBundle mainBundle] pathForResource:@"mv3" ofType:@"pte"];

// Create a module with the model file path. Nothing gets loaded into memory just yet.
ExecuTorchModule *module = [[ExecuTorchModule alloc] initWithFilePath:modelPath];

NSError *error;  // Optional error output argument to learn about failures.

// Force-load the program and 'forward' method. Otherwise, it's loaded at the first execution.
[module loadMethod:@"forward" error:&error];

float *imageBuffer = ...;  // Existing image buffer.

// Create an input tensor referencing the buffer and assuming the given shape and data type.
ExecuTorchTensor *inputTensor = [[ExecuTorchTensor alloc] initWithBytesNoCopy:imageBuffer
                                                                        shape:@[@1, @3, @224, @224]
                                                                     dataType:ExecuTorchDataTypeFloat];

// Execute the 'forward' method with the given input tensor and get output values back.
NSArray<ExecuTorchValue *> *outputs = [module forwardWithTensor:inputTensor error:&error];

// Get the first output value assuming it's a tensor.
ExecuTorchTensor *outputTensor = outputs.firstObject.tensor;

// Access the output tensor data.
[outputTensor bytesWithHandler:^(const void *pointer, NSInteger count, ExecuTorchDataType dataType) {
  float *logits = (float *)pointer;
  // Use logits...
}];
Swift
let modelPath = Bundle.main.path(forResource: "mv3", ofType: "pte")!

// Create a module with the model file path. Nothing gets loaded into memory just yet.
let module = Module(filePath: modelPath)

// Force-load the program and 'forward' method. Otherwise, it's loaded at the first execution.
try module.load("forward")

let imageBuffer: UnsafeMutableRawPointer = ... // Existing image buffer

// Create an input tensor referencing the buffer and assuming the given shape and data type.
let inputTensor = Tensor(
  bytesNoCopy: imageBuffer,
  shape: [1, 3, 224, 224],
  dataType: .float
)

// Execute the 'forward' method with the given input tensor and get output values back.
let outputs = try module.forward(inputTensor)

// Get the first output value assuming it's a tensor.
if let outputTensor = outputs.first?.tensor {
  // Access the output tensor data.
  outputTensor.bytes { pointer, count, dataType in
    // Copy the tensor data into logits array for easier access.
    let logits = Array(UnsafeBufferPointer(
      start: pointer.assumingMemoryBound(to: Float.self),
      count: count
    ))
    // Use logits...
  }
}
Tensor
Tensor 類(在 Objective-C 中公開為 ExecuTorchTensor)表示一個多維元素陣列(例如浮點數或整數),幷包含 shape(維度)和資料型別等元資料。Tensor 用於向模型饋送輸入和檢索輸出,或用於對原始資料進行任何計算。您可以從簡單的數字陣列建立 Tensor,檢查它們的屬性,讀取或修改其內容,甚至可以重塑或複製它們。
關鍵屬性:
dataType: 元素型別(例如,
.float、.int、.byte)。shape: 描述每個維度大小的
NSNumber陣列。count: 元素總數。
strides: 沿每個維度前進一個元素所需的記憶體跳躍步長。
dimensionOrder: 記憶體中的維度順序。
shapeDynamism: 指示 Tensor shape 是否可以更改(
.static、.dynamicBound、.dynamicUnbound)。
初始化:
您可以透過多種方式建立 Tensor
從現有記憶體緩衝區建立
init(bytesNoCopy:shape:dataType:...): 建立一個引用現有記憶體緩衝區而不進行復制的 Tensor。緩衝區的生命週期必須超過 Tensor 的生命週期。init(bytes:shape:dataType:...): 透過從記憶體緩衝區複製資料建立 Tensor。
從 NSData / Data 建立
init(data:shape:dataType:...): 使用NSData物件建立 Tensor,引用其位元組而不進行復制。
從標量陣列建立
init(_:shape:dataType:...): 從NSNumber標量陣列建立 Tensor。存在方便的初始化器,用於推斷 shape 或資料型別。
從單個標量建立
init(_:),init(_:dataType:),init(float:),init(int:), 等:建立 0 維 Tensor(標量)。
Objective-C
#import <ExecuTorch/ExecuTorch.h>

// Create from copying bytes.
float data[] = {1.0f, 2.0f, 3.0f, 4.0f};
NSArray<NSNumber *> *shape = @[@2, @2];
ExecuTorchTensor *tensorFromBytes = [[ExecuTorchTensor alloc] initWithBytes:data
                                                                      shape:shape
                                                                   dataType:ExecuTorchDataTypeFloat];

// Create from scalars.
NSArray<NSNumber *> *scalars = @[@(1), @(2), @(3)];
ExecuTorchTensor *tensorFromScalars = [[ExecuTorchTensor alloc] initWithScalars:scalars
                                                                       dataType:ExecuTorchDataTypeInt];

// Create a float scalar tensor.
ExecuTorchTensor *scalarTensor = [[ExecuTorchTensor alloc] initWithFloat:3.14f];
Swift
import ExecuTorch

// Create from existing buffer without copying.
var mutableData: [Float] = [1.0, 2.0, 3.0, 4.0]
let tensorNoCopy = mutableData.withUnsafeMutableBytes { bufferPointer in
  Tensor(
    bytesNoCopy: bufferPointer.baseAddress!,
    shape: [2, 2],
    dataType: .float
  )
}

// Create from Data (no copy).
let data = Data(bytes: mutableData, count: mutableData.count * MemoryLayout<Float>.size)
let tensorFromData = Tensor(data: data, shape: [2, 2], dataType: .float)

// Create from scalars (infers float type).
let tensorFromScalars = Tensor([1.0, 2.0, 3.0, 4.0], shape: [4])

// Create an Int scalar tensor.
let scalarTensor = Tensor(42) // Infers Int as .long data type (64-bit integer)
訪問資料:
使用 bytes(_:) 進行不可變訪問,使用 mutableBytes(_:) 進行可變訪問 Tensor 的底層資料緩衝區。
Objective-C
[tensor bytesWithHandler:^(const void *pointer, NSInteger count, ExecuTorchDataType dataType) {
  if (dataType == ExecuTorchDataTypeFloat) {
    const float *floatPtr = (const float *)pointer;
    NSLog(@"First float element: %f", floatPtr[0]);
  }
}];

[tensor mutableBytesWithHandler:^(void *pointer, NSInteger count, ExecuTorchDataType dataType) {
  if (dataType == ExecuTorchDataTypeFloat) {
    float *floatPtr = (float *)pointer;
    floatPtr[0] = 100.0f; // Modify the original mutableData buffer.
  }
}];
Swift
tensor.bytes { pointer, count, dataType in
  if dataType == .float {
    let buffer = UnsafeBufferPointer(start: pointer.assumingMemoryBound(to: Float.self), count: count)
    print("First float element: \(buffer.first ?? 0.0)")
  }
}

tensor.mutableBytes { pointer, count, dataType in
  if dataType == .float {
    let buffer = UnsafeMutableBufferPointer(start: pointer.assumingMemoryBound(to: Float.self), count: count)
    buffer[1] = 200.0 // Modify the original mutableData buffer.
  }
}
調整大小:
如果其底層記憶體分配允許(通常需要 Static 以外的 ShapeDynamism 或足夠的容量),則可以調整 Tensor 的大小。
Objective-C
NSError *error;
BOOL success = [tensor resizeToShape:@[@4, @1] error:&error];
if (success) {
  NSLog(@"Resized shape: %@", tensor.shape);
} else {
  NSLog(@"Resize failed: %@", error);
}
Swift
do {
  try tensor.resize(to: [4, 1])
  print("Resized shape: \(tensor.shape)")
} catch {
  print("Resize failed: \(error)")
}
Value
Value 類(在 Objective-C 中公開為 ExecuTorchValue)是一個動態容器,可以容納不同型別的資料,主要用於模型輸入和輸出。ExecuTorch 方法接受並返回 Value 物件陣列。
關鍵屬性:
tag: 指示所持有的資料型別(例如,.tensor、.integer、.string、.boolean)。isTensor,isInteger,isString, 等:用於檢查型別的布林屬性。tensor,integer,string,boolean,double: 訪問底層資料的訪問器(如果 tag 不匹配,則返回nil或預設值)。
初始化:
直接從它們應持有的資料建立 Value 物件。
Objective-C
#import <ExecuTorch/ExecuTorch.h>

ExecuTorchTensor *tensor = [[ExecuTorchTensor alloc] initWithFloat:1.0f];

ExecuTorchValue *tensorValue = [[ExecuTorchValue alloc] valueWithTensor:tensor];
ExecuTorchValue *intValue = [[ExecuTorchValue alloc] valueWithInteger:100];
ExecuTorchValue *stringValue = [[ExecuTorchValue alloc] valueWithString:@"hello"];
ExecuTorchValue *boolValue = [[ExecuTorchValue alloc] valueWithBoolean:YES];
ExecuTorchValue *doubleValue = [[ExecuTorchValue alloc] valueWithDouble:3.14];
Swift
import ExecuTorch

let tensor = Tensor(2.0)

let tensorValue = Value(tensor)
let intValue = Value(200)
let stringValue = Value("world")
let boolValue = Value(false)
let doubleValue = Value(2.718)
Module
Module 類(在 Objective-C 中公開為 ExecuTorchModule)表示一個已載入的 ExecuTorch 模型 (.pte 檔案)。它提供方法來載入模型程式並執行其內部方法(例如 forward)。
初始化:
透過提供 .pte 模型的檔案路徑建立 Module 例項。初始化本身是輕量級的,不會立即載入程式資料。
Objective-C
#import <ExecuTorch/ExecuTorch.h>

NSString *modelPath = [[NSBundle mainBundle] pathForResource:@"model" ofType:@"pte"];
ExecuTorchModule *module = [[ExecuTorchModule alloc] initWithFilePath:modelPath];
// Optional: specify load mode, e.g., memory mapping.
// ExecuTorchModule *moduleMmap = [[ExecuTorchModule alloc] initWithFilePath:modelPath
//                                                                   loadMode:ExecuTorchModuleLoadModeMmap];
Swift
import ExecuTorch

let modelPath = Bundle.main.path(forResource: "model", ofType: "pte")
let module = Module(filePath: modelPath!)
// Optional: specify load mode, e.g., memory mapping.
// let moduleMmap = Module(filePath: modelPath, loadMode: .mmap)
載入:
模型載入會延遲到明確請求或需要執行時進行。雖然執行呼叫可以自動觸發載入,但通常更有效的方式是提前顯式載入方法。
load(): 載入基本程式結構。預設使用最小驗證。load(_:): 載入程式結構並準備特定方法(例如“forward”)以供執行。這會執行必要的設定,例如後端委託,如果您知道將執行哪個方法,建議使用此方法。isLoaded()/isLoaded(_:): 檢查載入狀態。
Objective-C
NSError *error;
// Loads program and prepares 'forward' for execution.
BOOL success = [module loadMethod:@"forward" error:&error];
if (success) {
  NSLog(@"Forward method loaded: %d", [module isMethodLoaded:@"forward"]);
} else {
  NSLog(@"Failed to load method: %@", error);
}
Swift
do {
  // Loads program and prepares 'forward' for execution.
  try module.load("forward")
  print("Forward method loaded: \(module.isLoaded("forward"))")
} catch {
  print("Failed to load method: \(error)")
}
執行:
Module 類提供了靈活的方式來執行已載入程式中的方法。
命名執行:您可以使用
execute(methodName:inputs:)按名稱執行任何可用方法。Forward 快捷方式:對於執行主要推理方法的常見情況,請使用
forward(inputs:)快捷方式,它等同於使用方法名稱“forward”呼叫 execute。輸入靈活性:輸入可以透過多種方式提供
作為
Value物件陣列。這是最通用的形式。作為
Tensor物件陣列。這是一種便捷方式,其中 Tensor 會自動包裝到Value物件中。如果方法只期望一個輸入,則作為單個
Value或Tensor物件。如果方法不接受輸入,則不提供輸入。
輸出始終作為 Value 陣列返回。
Objective-C
ExecuTorchTensor *inputTensor1 = [[ExecuTorchTensor alloc] initWithScalars:@[@1.0f, @2.0f]];
ExecuTorchTensor *inputTensor2 = [[ExecuTorchTensor alloc] initWithScalars:@[@3.0f, @4.0f]];
ExecuTorchTensor *singleInputTensor = [[ExecuTorchTensor alloc] initWithFloat:5.0f];
NSError *error;

// Execute "forward" using the shortcut with an array of Tensors.
NSArray<ExecuTorchValue *> *outputs1 = [module forwardWithTensors:@[inputTensor1, inputTensor2] error:&error];
if (outputs1) {
  NSLog(@"Forward output count: %lu", (unsigned long)outputs1.count);
} else {
  NSLog(@"Execution failed: %@", error);
}

// Execute "forward" with a single Tensor input.
NSArray<ExecuTorchValue *> *outputs2 = [module forwardWithTensor:singleInputTensor error:&error];
if (outputs2) {
    NSLog(@"Forward single input output count: %lu", (unsigned long)outputs2.count);
} else {
    NSLog(@"Execution failed: %@", error);
}

// Execute a potentially different method by name.
NSArray<ExecuTorchValue *> *outputs3 = [module executeMethod:@"another_method"
                                                   withInput:[[ExecuTorchValue alloc] valueWithTensor:inputTensor1]
                                                       error:&error];

// Process outputs (assuming first output is a tensor).
if (outputs1) {
  ExecuTorchValue *firstOutput = outputs1.firstObject;
  if (firstOutput.isTensor) {
    ExecuTorchTensor *resultTensor = firstOutput.tensorValue;
    // Process resultTensor.
  }
}
Swift
let inputTensor1 = Tensor([1.0, 2.0], dataType: .float)
let inputTensor2 = Tensor([3.0, 4.0], dataType: .float)
let singleInputTensor = Tensor([5.0], dataType: .float)

do {
  // Execute "forward" using the shortcut with an array of Tensors.
  let outputs1 = try module.forward([inputTensor1, inputTensor2])
  print("Forward output count: \(outputs1.count)")

  // Execute "forward" with a single Tensor input.
  let outputs2 = try module.forward(singleInputTensor)
  print("Forward single input output count: \(outputs2.count)")

  // Execute a potentially different method by name.
  let outputs3 = try module.execute("another_method", inputs: [Value(inputTensor1)])

  // Process outputs (assuming first output is a tensor).
  if let resultTensor = outputs1.first?.tensor {
    resultTensor.bytes { ptr, count, dtype in
      // Access result data.
    }
  }
} catch {
  print("Execution failed: \(error)")
}
方法名稱:
程式載入後,您可以查詢模型中可用的方法名稱。
Objective-C
NSError *error;

// Note: methodNames: will load the program if not already loaded.
NSSet<NSString *> *names = [module methodNames:&error];
if (names) {
  NSLog(@"Available methods: %@", names);
} else {
  NSLog(@"Could not get method names: %@", error);
}
Swift
do {
  // Note: methodNames() will load the program if not already loaded.
  let names = try module.methodNames()
  print("Available methods: \(names)") // Output: e.g., {"forward"}
} catch {
  print("Could not get method names: \(error)")
}
日誌記錄
ExecuTorch 透過 ExecuTorchLog(在 Swift 中為 Log)單例提供用於 Objective-C 和 Swift 的日誌記錄 API。您可以訂閱符合 ExecuTorchLogSink(在 Swift 中為 LogSink)協議的自定義日誌接收器,以接收內部 ExecuTorch 日誌訊息。
注意:ExecuTorch 框架的 Release 版本構建會移除日誌。要在開發期間捕獲日誌,請連結 Debug 構建版本(例如,executorch_debug)。
Objective-C
#import <ExecuTorch/ExecuTorch.h>
#import <os/log.h>

@interface MyClass : NSObject<ExecuTorchLogSink>
@end

@implementation MyClass

- (instancetype)init {
  self = [super init];
  if (self) {
#if DEBUG
    [ExecuTorchLog.sharedLog addSink:self];
#endif
  }
  return self;
}

- (void)dealloc {
#if DEBUG
  [ExecuTorchLog.sharedLog removeSink:self];
#endif
}

#if DEBUG
- (void)logWithLevel:(ExecuTorchLogLevel)level
           timestamp:(NSTimeInterval)timestamp
            filename:(NSString *)filename
                line:(NSUInteger)line
             message:(NSString *)message {
  NSString *logMessage = [NSString stringWithFormat:@"%@:%lu %@", filename, (unsigned long)line, message];
  switch (level) {
    case ExecuTorchLogLevelDebug:
      os_log_with_type(OS_LOG_DEFAULT, OS_LOG_TYPE_DEBUG, "%{public}@", logMessage);
      break;
    case ExecuTorchLogLevelInfo:
      os_log_with_type(OS_LOG_DEFAULT, OS_LOG_TYPE_INFO, "%{public}@", logMessage);
      break;
    case ExecuTorchLogLevelError:
      os_log_with_type(OS_LOG_DEFAULT, OS_LOG_TYPE_ERROR, "%{public}@", logMessage);
      break;
    case ExecuTorchLogLevelFatal:
      os_log_with_type(OS_LOG_DEFAULT, OS_LOG_TYPE_FAULT, "%{public}@", logMessage);
      break;
    default:
      os_log(OS_LOG_DEFAULT, "%{public}@", logMessage);
      break;
  }
}
#endif

@end
Swift
import ExecuTorch
import os.log

public class MyClass {
  public init() {
    #if DEBUG
    Log.shared.add(sink: self)
    #endif
  }
  deinit {
    #if DEBUG
    Log.shared.remove(sink: self)
    #endif
  }
}

#if DEBUG
extension MyClass: LogSink {
  public func log(level: LogLevel, timestamp: TimeInterval, filename: String, line: UInt, message: String) {
    let logMessage = "\(filename):\(line) \(message)"
    switch level {
    case .debug:
      os_log(.debug, "%{public}@", logMessage)
    case .info:
      os_log(.info, "%{public}@", logMessage)
    case .error:
      os_log(.error, "%{public}@", logMessage)
    case .fatal:
      os_log(.fault, "%{public}@", logMessage)
    default:
      os_log("%{public}@", logMessage)
    }
  }
}
#endif
注意:在示例中,當代碼未以 Debug 模式構建時(即未定義 DEBUG 宏或其值為零),日誌會被有意移除。
除錯
如果您正在連結 ExecuTorch 框架的 Debug 構建版本,請在除錯會話中使用以下 LLDB 命令配置您的偵錯程式,以正確對映原始碼
settings append target.source-map /executorch <path_to_executorch_source_code>
故障排除
執行緩慢
確保匯出的模型正在使用合適的後端,例如 XNNPACK、Core ML 或 MPS。如果已呼叫正確的後端但效能問題仍然存在,請確認您連結的是後端執行時的 Release 構建版本。
為了獲得最佳效能,也將 ExecuTorch 執行時連結為 Release 模式。如果需要除錯,可以將 ExecuTorch 執行時保持在 Debug 模式,這不會對效能產生太大影響,但會保留日誌記錄和除錯符號。
Swift PM
如果遇到 Swift PM 的校驗和不匹配錯誤,請使用 Xcode 選單(檔案 > 包 > 重置包快取)或以下命令清除包快取
rm -rf <YouProjectName>.xcodeproj/project.xcworkspace/xcshareddata/swiftpm \
  ~/Library/org.swift.swiftpm \
  ~/Library/Caches/org.swift.swiftpm \
  ~/Library/Caches/com.apple.dt.Xcode \
  ~/Library/Developer/Xcode/DerivedData
注意:在執行終端命令之前,請確保 Xcode 已完全退出,以避免與活動程序衝突。
