將掩碼重塑為邊界框
以下示例演示了 torchvision.ops 模組中可用的操作,用於將分割掩碼重塑為用於不同任務的物件定位標註(例如,將例項和全景分割方法使用的掩碼轉換為物件檢測方法使用的邊界框)。
import os
import numpy as np
import torch
import matplotlib.pyplot as plt

import torchvision.transforms.functional as F


ASSETS_DIRECTORY = "../assets"

plt.rcParams["savefig.bbox"] = "tight"


def show(imgs):
    if not isinstance(imgs, list):
        imgs = [imgs]
    fix, axs = plt.subplots(ncols=len(imgs), squeeze=False)
    for i, img in enumerate(imgs):
        img = img.detach()
        img = F.to_pil_image(img)
        axs[0, i].imshow(np.asarray(img))
        axs[0, i].set(xticklabels=[], yticklabels=[], xticks=[], yticks=[])
掩碼
在例項分割和全景分割等任務中,掩碼通常被定義為多維陣列(例如 NumPy 陣列或 PyTorch 張量),並由本包定義,其形狀如下
(物件數量, 高度, 寬度)
其中 num_objects 是影像中標註物件的數量。每個 (高度, 寬度) 物件恰好對應一個物件。例如,如果您的輸入影像尺寸為 224 x 224 並且有四個標註物件,則您的掩碼標註的形狀如下
(4, 224, 224).
掩碼的一個優點是它們可以輕鬆地重塑後用於解決各種物件定位任務的方法中。
將掩碼轉換為邊界框
例如,masks_to_boxes() 操作可用於將掩碼轉換為邊界框,這些邊界框可用作 FasterRCNN 和 RetinaNet 等檢測模型的輸入。我們將使用來自 PenFudan 資料集的影像和掩碼。
from torchvision.io import decode_image

img_path = os.path.join(ASSETS_DIRECTORY, "FudanPed00054.png")
mask_path = os.path.join(ASSETS_DIRECTORY, "FudanPed00054_mask.png")
img = decode_image(img_path)
mask = decode_image(mask_path)
這裡的掩碼錶示為 PNG 影像,帶有浮點值。每個畫素被編碼為不同的顏色,其中 0 表示背景。請注意,影像和掩碼的空間維度是匹配的。
torch.Size([1, 498, 533])
torch.Size([3, 498, 533])
tensor([[[0, 0, 0,  ..., 0, 0, 0],
         [0, 0, 0,  ..., 0, 0, 0],
         [0, 0, 0,  ..., 0, 0, 0],
         ...,
         [0, 0, 0,  ..., 0, 0, 0],
         [0, 0, 0,  ..., 0, 0, 0],
         [0, 0, 0,  ..., 0, 0, 0]]], dtype=torch.uint8)
# We get the unique colors, as these would be the object ids.
obj_ids = torch.unique(mask)

# first id is the background, so remove it.
obj_ids = obj_ids[1:]

# split the color-encoded mask into a set of boolean masks.
# Note that this snippet would work as well if the masks were float values instead of ints.
masks = mask == obj_ids[:, None, None]
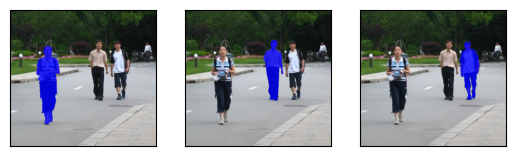
現在掩碼是一個布林張量。在這種情況下,第一個維度是 3,表示例項的數量:影像中有 3 個人。另外兩個維度是高度和寬度,與影像的尺寸相同。對於每個例項,布林張量表示特定畫素是否屬於影像的分割掩碼。
torch.Size([3, 498, 533])
tensor([[[False, False, False,  ..., False, False, False],
         [False, False, False,  ..., False, False, False],
         [False, False, False,  ..., False, False, False],
         ...,
         [False, False, False,  ..., False, False, False],
         [False, False, False,  ..., False, False, False],
         [False, False, False,  ..., False, False, False]],

        [[False, False, False,  ..., False, False, False],
         [False, False, False,  ..., False, False, False],
         [False, False, False,  ..., False, False, False],
         ...,
         [False, False, False,  ..., False, False, False],
         [False, False, False,  ..., False, False, False],
         [False, False, False,  ..., False, False, False]]])
讓我們視覺化一張影像並繪製其對應的分割掩碼。我們將使用 draw_segmentation_masks() 來繪製分割掩碼。
from torchvision.utils import draw_segmentation_masks

drawn_masks = []
for mask in masks:
    drawn_masks.append(draw_segmentation_masks(img, mask, alpha=0.8, colors="blue"))

show(drawn_masks)
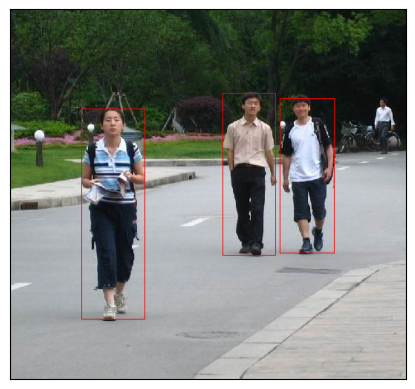
要將布林掩碼轉換為邊界框。我們將使用 torchvision.ops 模組中的 masks_to_boxes()。它以 (xmin, ymin, xmax, ymax) 格式返回邊界框。
torch.Size([3, 4])
tensor([[ 96., 134., 181., 417.],
        [286., 113., 357., 331.],
        [363., 120., 436., 328.]])
正如形狀所示,有 3 個邊界框,並以 (xmin, ymin, xmax, ymax) 格式表示。這些可以使用 torchvision.utils 中提供的 draw_bounding_boxes() 實用工具輕鬆視覺化。
from torchvision.utils import draw_bounding_boxes

drawn_boxes = draw_bounding_boxes(img, boxes, colors="red")
show(drawn_boxes)
這些邊界框現在可以直接被 torchvision 中的檢測模型使用。這裡演示了從 fasterrcnn_resnet50_fpn() 載入的 Faster R-CNN 模型。
from torchvision.models.detection import fasterrcnn_resnet50_fpn, FasterRCNN_ResNet50_FPN_Weights

weights = FasterRCNN_ResNet50_FPN_Weights.DEFAULT
model = fasterrcnn_resnet50_fpn(weights=weights, progress=False)
print(img.size())

transforms = weights.transforms()
img = transforms(img)
target = {}
target["boxes"] = boxes
target["labels"] = labels = torch.ones((masks.size(0),), dtype=torch.int64)
detection_outputs = model(img.unsqueeze(0), [target])
Downloading: "https://download.pytorch.org/models/fasterrcnn_resnet50_fpn_coco-258fb6c6.pth" to /root/.cache/torch/hub/checkpoints/fasterrcnn_resnet50_fpn_coco-258fb6c6.pth
torch.Size([3, 498, 533])
將分割資料集轉換為檢測資料集
有了這個實用工具,將分割資料集轉換為檢測資料集變得非常簡單。這樣我們就可以使用分割資料集來訓練檢測模型。同樣,可以將全景資料集轉換為檢測資料集。這裡有一個示例,我們重新利用了來自 PenFudan 檢測教程的資料集。
class SegmentationToDetectionDataset(torch.utils.data.Dataset):
    def __init__(self, root, transforms):
        self.root = root
        self.transforms = transforms
        # load all image files, sorting them to
        # ensure that they are aligned
        self.imgs = list(sorted(os.listdir(os.path.join(root, "PNGImages"))))
        self.masks = list(sorted(os.listdir(os.path.join(root, "PedMasks"))))

    def __getitem__(self, idx):
        # load images and masks
        img_path = os.path.join(self.root, "PNGImages", self.imgs[idx])
        mask_path = os.path.join(self.root, "PedMasks", self.masks[idx])

        img = decode_image(img_path)
        mask = decode_image(mask_path)

        img = F.convert_image_dtype(img, dtype=torch.float)
        mask = F.convert_image_dtype(mask, dtype=torch.float)

        # We get the unique colors, as these would be the object ids.
        obj_ids = torch.unique(mask)

        # first id is the background, so remove it.
        obj_ids = obj_ids[1:]

        # split the color-encoded mask into a set of boolean masks.
        masks = mask == obj_ids[:, None, None]

        boxes = masks_to_boxes(masks)

        # there is only one class
        labels = torch.ones((masks.shape[0],), dtype=torch.int64)

        target = {}
        target["boxes"] = boxes
        target["labels"] = labels

        if self.transforms is not None:
            img, target = self.transforms(img, target)

        return img, target
指令碼總執行時間: (0 分鐘 2.157 秒)
