


注意
點選此處下載完整的示例程式碼
ONNX 簡介 || 將 PyTorch 模型匯出到 ONNX || 擴充套件 ONNX 匯出器運算元支援 || 匯出帶有控制流的模型到 ONNX
將 PyTorch 模型匯出到 ONNX
創建於:2023 年 10 月 04 日 | 最後更新於:2025 年 03 月 05 日 | 最後驗證於:2024 年 11 月 05 日
作者:Ti-Tai Wang, Justin Chu, Thiago Crepaldi。
注意
截至 PyTorch 2.5,ONNX Exporter 有兩個版本。
torch.onnx.export(..., dynamo=True)是最新的(仍在 beta 階段)匯出器,它使用torch.export和 Torch FX 捕獲圖。它隨 PyTorch 2.5 釋出。torch.onnx.export使用 TorchScript,自 PyTorch 1.2.0 起可用。
在60 分鐘閃電戰中,我們有機會從高層面瞭解 PyTorch 並訓練了一個小型神經網路進行影像分類。在本教程中,我們將擴充套件此內容,描述如何使用 torch.onnx.export(..., dynamo=True) ONNX 匯出器將 PyTorch 中定義的模型轉換為 ONNX 格式。
儘管 PyTorch 非常適合模型開發的迭代過程,但模型可以使用不同的格式部署到生產環境,包括 ONNX (開放神經網路交換)!
ONNX 是一種靈活的開放標準格式,用於表示機器學習模型。標準化的機器學習表示允許模型在各種硬體平臺和執行時環境中執行,從基於雲的大規模超級計算機到資源受限的邊緣裝置,例如您的網路瀏覽器和手機。
在本教程中,我們將學習如何:
安裝所需的依賴項。
編寫一個簡單的影像分類器模型。
將模型匯出為 ONNX 格式。
將 ONNX 模型儲存到檔案中。
使用 Netron 視覺化 ONNX 模型圖。
使用 ONNX Runtime 執行 ONNX 模型
將 PyTorch 的結果與 ONNX Runtime 的結果進行比較。
1. 安裝所需的依賴項
由於 ONNX 匯出器使用 onnx 和 onnxscript 將 PyTorch 運算元轉換為 ONNX 運算元,因此我們需要安裝它們。
pip install --upgrade onnx onnxscript
2. 編寫一個簡單的影像分類器模型
環境設定好後,讓我們開始使用 PyTorch 建模我們的影像分類器,就像我們在60 分鐘閃電戰中所做的那樣。
import torch
import torch.nn as nn
import torch.nn.functional as F


class ImageClassifierModel(nn.Module):
    def __init__(self):
        super().__init__()
        self.conv1 = nn.Conv2d(1, 6, 5)
        self.conv2 = nn.Conv2d(6, 16, 5)
        self.fc1 = nn.Linear(16 * 5 * 5, 120)
        self.fc2 = nn.Linear(120, 84)
        self.fc3 = nn.Linear(84, 10)

    def forward(self, x: torch.Tensor):
        x = F.max_pool2d(F.relu(self.conv1(x)), (2, 2))
        x = F.max_pool2d(F.relu(self.conv2(x)), 2)
        x = torch.flatten(x, 1)
        x = F.relu(self.fc1(x))
        x = F.relu(self.fc2(x))
        x = self.fc3(x)
        return x
3. 將模型匯出為 ONNX 格式
模型定義好後,我們需要例項化它並建立一個隨機的 32x32 輸入。接下來,我們可以將模型匯出為 ONNX 格式。
torch_model = ImageClassifierModel()
# Create example inputs for exporting the model. The inputs should be a tuple of tensors.
example_inputs = (torch.randn(1, 1, 32, 32),)
onnx_program = torch.onnx.export(torch_model, example_inputs, dynamo=True)
/usr/local/lib/python3.10/dist-packages/onnxscript/converter.py:823: FutureWarning:

'onnxscript.values.Op.param_schemas' is deprecated in version 0.1 and will be removed in the future. Please use '.op_signature' instead.

/usr/local/lib/python3.10/dist-packages/onnxscript/converter.py:823: FutureWarning:

'onnxscript.values.OnnxFunction.param_schemas' is deprecated in version 0.1 and will be removed in the future. Please use '.op_signature' instead.

[torch.onnx] Obtain model graph for `ImageClassifierModel([...]` with `torch.export.export(..., strict=False)`...
[torch.onnx] Obtain model graph for `ImageClassifierModel([...]` with `torch.export.export(..., strict=False)`... ✅
[torch.onnx] Run decomposition...
[torch.onnx] Run decomposition... ✅
[torch.onnx] Translate the graph into ONNX...
[torch.onnx] Translate the graph into ONNX... ✅
3.5. (可選)最佳化 ONNX 模型
ONNX 模型可以透過常量摺疊和消除冗餘節點進行最佳化。最佳化是就地進行的,因此原始 ONNX 模型會被修改。
正如我們所見,模型無需進行任何程式碼更改。生成的 ONNX 模型作為二進位制 protobuf 檔案儲存在 torch.onnx.ONNXProgram 中。
4. 將 ONNX 模型儲存到檔案中
儘管將匯出的模型載入到記憶體中在許多應用中很有用,但我們可以使用以下程式碼將其儲存到磁碟:
onnx_program.save("image_classifier_model.onnx")
你可以使用以下程式碼將 ONNX 檔案重新載入到記憶體中,並檢查其格式是否正確:
import onnx

onnx_model = onnx.load("image_classifier_model.onnx")
onnx.checker.check_model(onnx_model)
5. 使用 Netron 視覺化 ONNX 模型圖
模型儲存到檔案中後,我們可以使用 Netron 對其進行視覺化。Netron 可以安裝在 macOS、Linux 或 Windows 計算機上,也可以直接從瀏覽器執行。讓我們透過開啟以下連結來嘗試網頁版:https://netron.app/。
開啟 Netron 後,我們可以將 image_classifier_model.onnx 檔案拖放到瀏覽器中,或者點選開啟模型按鈕後選擇它。
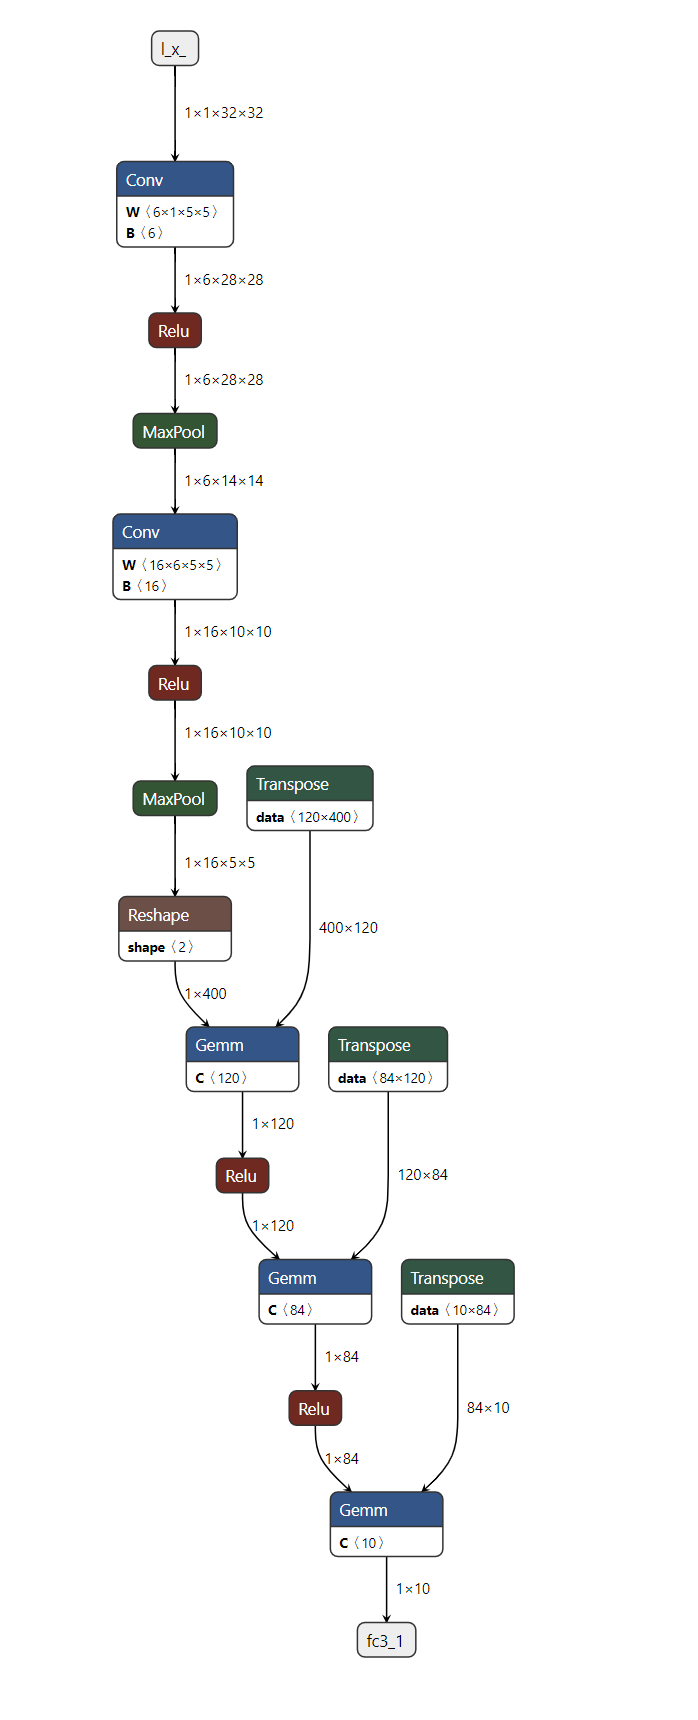
就這樣!我們成功地將 PyTorch 模型匯出為 ONNX 格式,並使用 Netron 對其進行了視覺化。
6. 使用 ONNX Runtime 執行 ONNX 模型
最後一步是使用 ONNX Runtime 執行 ONNX 模型,但在執行之前,讓我們先安裝 ONNX Runtime。
pip install onnxruntime
ONNX 標準不支援 PyTorch 支援的所有資料結構和型別,因此在將其饋送到 ONNX Runtime 之前,我們需要將 PyTorch 輸入適應 ONNX 格式。在我們的示例中,輸入恰好是相同的,但在更復雜的模型中,它可能比原始 PyTorch 模型具有更多輸入。
ONNX Runtime 需要一個額外的步驟,即將所有 PyTorch 張量轉換為 Numpy (在 CPU 中),並將其包裝在一個字典中,其中鍵是輸入名稱的字串,值是 numpy 張量。
現在我們可以建立一個 ONNX Runtime 推理會話,使用處理後的輸入執行 ONNX 模型並獲取輸出。在本教程中,ONNX Runtime 在 CPU 上執行,但也可以在 GPU 上執行。
import onnxruntime

onnx_inputs = [tensor.numpy(force=True) for tensor in example_inputs]
print(f"Input length: {len(onnx_inputs)}")
print(f"Sample input: {onnx_inputs}")

ort_session = onnxruntime.InferenceSession(
    "./image_classifier_model.onnx", providers=["CPUExecutionProvider"]
)

onnxruntime_input = {input_arg.name: input_value for input_arg, input_value in zip(ort_session.get_inputs(), onnx_inputs)}

# ONNX Runtime returns a list of outputs
onnxruntime_outputs = ort_session.run(None, onnxruntime_input)[0]
Input length: 1
Sample input: [array([[[[-1.0416038 ,  1.1125288 , -0.36015213, ..., -0.01891615,
          -1.2205342 ,  0.34716162],
         [ 0.6650918 ,  1.1037157 , -0.3673973 , ..., -1.4723971 ,
           0.25391102, -0.07882219],
         [-0.1238785 , -0.6457882 , -0.7785251 , ..., -0.26744807,
           0.30193356, -0.5681653 ],
         ...,
         [-0.02998495, -0.48333594, -0.39282662, ..., -1.2405719 ,
           0.84881294, -0.5473476 ],
         [-0.8185182 , -0.1276281 ,  0.34752363, ..., -1.0701932 ,
          -1.6922146 , -0.60484964],
         [ 0.8267504 , -0.02483911, -0.33541355, ..., -0.917776  ,
          -0.32401627,  0.7485422 ]]]], dtype=float32)]
7. 將 PyTorch 的結果與 ONNX Runtime 的結果進行比較
確定匯出的模型是否良好執行的最佳方法是與作為我們事實來源的 PyTorch 進行數值評估。
為此,我們需要使用相同的輸入執行 PyTorch 模型,並將結果與 ONNX Runtime 的結果進行比較。在比較結果之前,我們需要將 PyTorch 的輸出轉換為與 ONNX 格式匹配。
torch_outputs = torch_model(*example_inputs)

assert len(torch_outputs) == len(onnxruntime_outputs)
for torch_output, onnxruntime_output in zip(torch_outputs, onnxruntime_outputs):
    torch.testing.assert_close(torch_output, torch.tensor(onnxruntime_output))

print("PyTorch and ONNX Runtime output matched!")
print(f"Output length: {len(onnxruntime_outputs)}")
print(f"Sample output: {onnxruntime_outputs}")
PyTorch and ONNX Runtime output matched!
Output length: 1
Sample output: [[ 0.14531787 -0.05903321 -0.00652155  0.09054166  0.01458297 -0.08046442
  -0.12109031 -0.03938238 -0.01814789 -0.01363543]]
結論
就這些了!我們成功地將 PyTorch 模型匯出為 ONNX 格式,將模型儲存到磁碟,使用 Netron 檢視,使用 ONNX Runtime 執行,並最終將其數值結果與 PyTorch 的結果進行了比較。
延伸閱讀
下面的列表包含從基本示例到高階場景的教程,順序不一定按此處所列。你可以隨意直接跳到你感興趣的特定主題,或者耐心閱讀所有內容,瞭解 ONNX 匯出器的所有知識。
指令碼總執行時間: ( 0 分 1.249 秒)
