


注意
點選這裡下載完整的示例程式碼
autograd 儲存的張量的鉤子
創建於: Nov 03, 2021 | 最後更新於: Aug 27, 2024 | 最後驗證於: 未驗證
PyTorch 通常使用反向傳播計算梯度。然而,某些操作需要儲存中間結果以便執行反向傳播。本教程將詳細介紹如何儲存/檢索這些張量,以及如何定義鉤子來控制打包/解包過程。
本教程假設您熟悉反向傳播的理論工作原理。如果還不熟悉,請先閱讀這篇文章。
儲存的張量
訓練模型通常比執行推理消耗更多記憶體。從廣義上講,可以說這是因為“PyTorch 需要儲存計算圖,這對於呼叫 backward 是必需的”,因此增加了記憶體使用量。本教程的一個目標是微調這種理解。
事實上,圖本身有時不會消耗更多記憶體,因為它從不復制任何張量。然而,圖可以保留對張量的引用,否則這些張量就會超出作用域:這些引用被稱為儲存的張量。
為什麼訓練模型通常比評估模型需要更多記憶體?
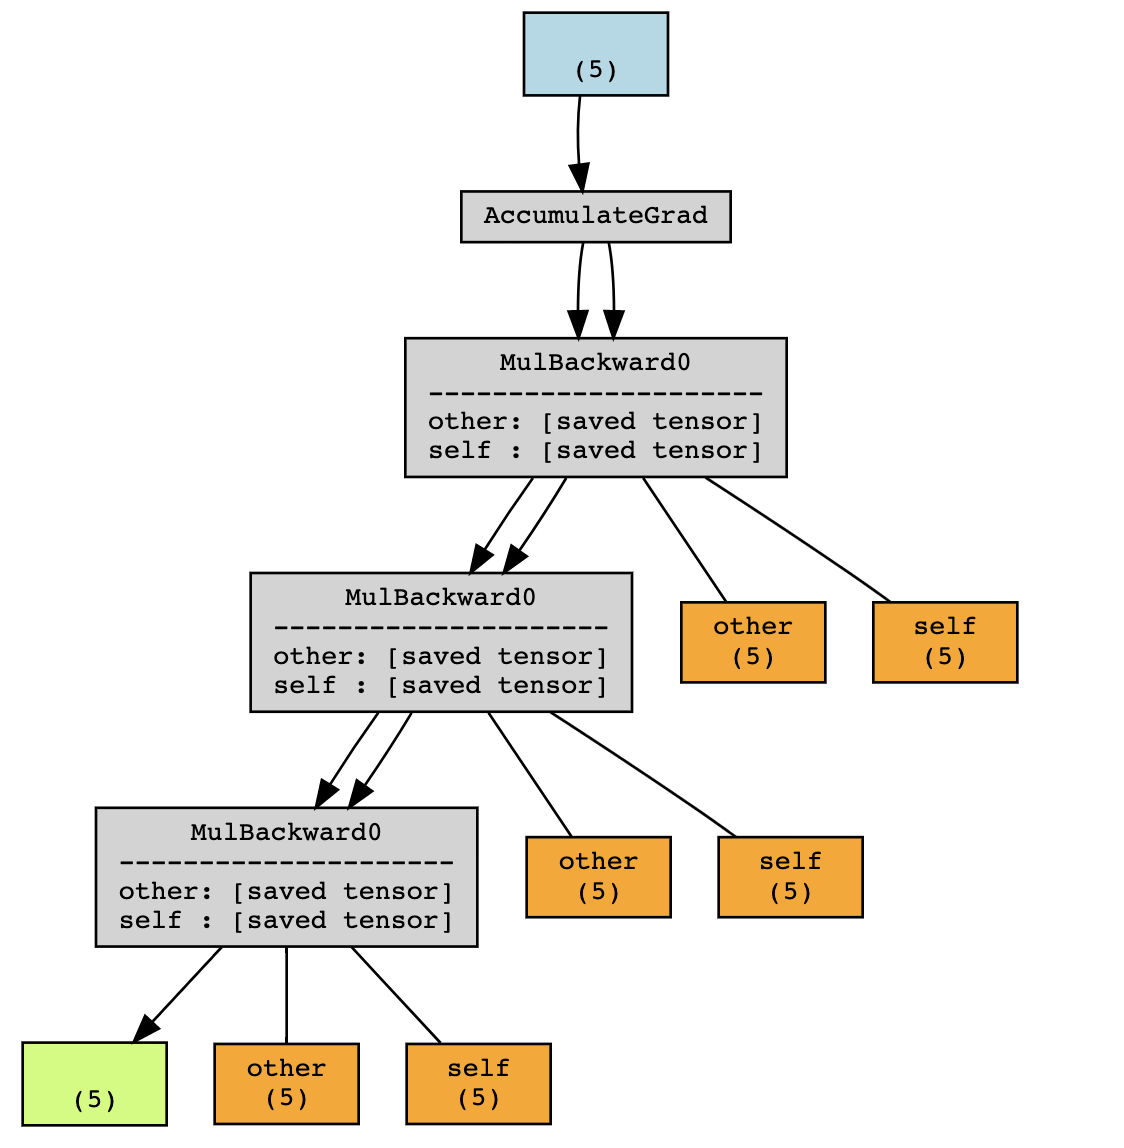
我們從一個簡單的例子開始:\(y = a \cdot b\),我們知道 \(y\) 關於 \(a\) 和 \(b\) 的梯度:
import torch

a = torch.randn(5, requires_grad=True)
b = torch.ones(5, requires_grad=True)
y = a * b
使用 torchviz,我們可以視覺化計算圖

在此示例中,PyTorch 儲存中間值 \(a\) 和 \(b\),以便在反向傳播期間計算梯度。

這些中間值(在上圖中呈橙色)可以透過查詢 y 的 grad_fn 中以 _saved 為字首的屬性來訪問(出於除錯目的)
tensor([ 0.3367,  0.1288,  0.2345,  0.2303, -1.1229], requires_grad=True)
tensor([1., 1., 1., 1., 1.], requires_grad=True)
隨著計算圖的深度增加,它將儲存更多儲存的張量。同時,如果不是因為圖,這些張量就會超出作用域。
在上面的例子中,在沒有 grad 的情況下執行只會將 x 和 y 保留在作用域內,但圖還會額外儲存 f(x) 和 f(f(x))。因此,訓練期間執行前向傳播將比評估期間消耗更多記憶體(更準確地說,是在不需要 autograd 的時候)。
打包/解包的概念
回到第一個例子:y.grad_fn._saved_self 和 y.grad_fn._saved_other 分別指向原始張量物件 a 和 b。
True
True
然而,情況並非總是如此。
True
False
在底層,PyTorch 對張量 y 進行了打包和解包操作,以防止引用迴圈。
通常來說,您不應該依賴於訪問為反向傳播儲存的張量會得到與原始張量相同的張量物件。然而,它們將共享相同的儲存。
儲存的張量鉤子
PyTorch 提供了一個 API 來控制如何打包/解包儲存的張量。
def pack_hook(x):
    print("Packing", x)
    return x

def unpack_hook(x):
    print("Unpacking", x)
    return x
a = torch.ones(5, requires_grad=True)
b = torch.ones(5, requires_grad=True) * 2

with torch.autograd.graph.saved_tensors_hooks(pack_hook, unpack_hook):
    y = a * b

y.sum().backward()
Packing tensor([2., 2., 2., 2., 2.], grad_fn=<MulBackward0>)
Packing tensor([1., 1., 1., 1., 1.], requires_grad=True)
Unpacking tensor([2., 2., 2., 2., 2.], grad_fn=<MulBackward0>)
Unpacking tensor([1., 1., 1., 1., 1.], requires_grad=True)
pack_hook 函式將在每次操作為反向傳播儲存張量時呼叫。pack_hook 的輸出隨後儲存在計算圖中,而不是原始張量。unpack_hook 使用該返回值計算一個新的張量,該張量是在反向傳播過程中實際使用的張量。通常,您希望 unpack_hook(pack_hook(t)) 等於 t。
需要注意的是,pack_hook 的輸出可以是任何 Python 物件,只要 unpack_hook 可以從中派生出具有正確值的張量即可。
一些非常規示例
首先,一些愚蠢的例子來說明什麼是可能的,但你可能永遠不想這樣做。
返回一個 int
返回 Python 列表的索引 相對無害,但實用性值得商榷
返回一個元組
返回某個張量以及如何解包它的函式 以當前形式來看,不太可能有用
def pack(x):
    delta = torch.randn(*x.size())
    return x - delta, lambda x: x + delta

def unpack(packed):
    x, f = packed
    return f(x)


x = torch.randn(5, requires_grad=True)
with torch.autograd.graph.saved_tensors_hooks(pack, unpack):
    y = x * x
y.sum().backward()

assert(torch.allclose(x.grad, 2 * x))
返回一個 str
返回張量的 __repr__ 可能永遠不要這樣做
儘管這些例子在實踐中沒有用,但它們說明 pack_hook 的輸出確實可以是任何 Python 物件,只要它包含足夠的資訊來檢索原始張量的內容。在下一節中,我們將重點介紹更有用的應用。
將張量儲存到 CPU
很多時候,計算圖中涉及的張量位於 GPU 上。在圖中保留對這些張量的引用是導致大多數模型在訓練期間 GPU 記憶體不足的原因,而它們在評估期間會執行良好。
鉤子提供了一種非常簡單的方式來實現這一點。
def pack_hook(x):
    return (x.device, x.cpu())

def unpack_hook(packed):
    device, tensor = packed
    return tensor.to(device)

x = torch.randn(5, requires_grad=True)
with torch.autograd.graph.saved_tensors_hooks(pack, unpack):
    y = x * x
y.sum().backward()

torch.allclose(x.grad, (2 * x))
True
事實上,PyTorch 提供了一個 API 來方便地使用這些鉤子(以及使用固定記憶體的功能)。
import torch.nn as nn

class Model(nn.Module):
    def __init__(self):
        super().__init__()
        self.w = nn.Parameter(torch.randn(5))

    def forward(self, x):
        with torch.autograd.graph.save_on_cpu(pin_memory=True):
            # some computation
            return self.w * x

x = torch.randn(5)
model = Model()
loss = model(x).sum()
loss.backward()
在實踐中,在 A100 GPU 上,對於 ResNet-152,批次大小為 256 時,這對應於 GPU 記憶體使用量從 48GB 減少到 5GB,代價是速度減慢 6 倍。
當然,您可以透過只將網路的某些部分儲存到 CPU 來調整這種權衡。
例如,您可以定義一個特殊的 nn.Module,它包裝任何模組並將其張量儲存到 CPU。
class SaveToCpu(nn.Module):
    def __init__(self, module):
        super().__init__()
        self.module = module

    def forward(self, *args, **kwargs):
        with torch.autograd.graph.save_on_cpu(pin_memory=True):
            return self.module(*args, **kwargs)

model = nn.Sequential(
    nn.Linear(10, 100),
    SaveToCpu(nn.Linear(100, 100)),
    nn.Linear(100, 10),
)

x = torch.randn(10)
loss = model(x).sum()
loss.backward()
將張量儲存到磁碟
類似地,您可能希望將這些張量儲存到磁碟。同樣,這可以使用這些鉤子實現。
一個簡單的版本如下所示。
# Naive version - HINT: Don't do this

import uuid
tmp_dir = "temp"

def pack_hook(tensor):
    name = os.path.join(tmp_dir, str(uuid.uuid4()))
    torch.save(tensor, name)
    return name

def unpack_hook(name):
    return torch.load(name, weights_only=True)
上面程式碼的問題在於我們在磁碟上洩露了檔案,並且它們從未被清除。修復這個問題並不像看起來那麼簡單。
# Incorrect version - HINT: Don't do this

import uuid
import os
import tempfile
tmp_dir_obj = tempfile.TemporaryDirectory()
tmp_dir = tmp_dir_obj.name

def pack_hook(tensor):
    name = os.path.join(tmp_dir, str(uuid.uuid4()))
    torch.save(tensor, name)
    return name

def unpack_hook(name):
    tensor = torch.load(name, weights_only=True)
    os.remove(name)
    return tensor
上面程式碼不起作用的原因是 unpack_hook 可以被多次呼叫。如果我們第一次解包時刪除了檔案,當第二次訪問儲存的張量時,它將不可用,這將引發錯誤。
x = torch.ones(5, requires_grad=True)
with torch.autograd.graph.saved_tensors_hooks(pack_hook, unpack_hook):
    y = x.pow(2)
print(y.grad_fn._saved_self)
try:
    print(y.grad_fn._saved_self)
    print("Double access succeeded!")
except:
    print("Double access failed!")
tensor([1., 1., 1., 1., 1.], requires_grad=True)
Double access failed!
為了解決這個問題,我們可以編寫一個版本的鉤子,利用 PyTorch 在不再需要時會自動釋放(刪除)儲存的資料這一事實。
class SelfDeletingTempFile():
    def __init__(self):
        self.name = os.path.join(tmp_dir, str(uuid.uuid4()))

    def __del__(self):
        os.remove(self.name)

def pack_hook(tensor):
    temp_file = SelfDeletingTempFile()
    torch.save(tensor, temp_file.name)
    return temp_file

def unpack_hook(temp_file):
    return torch.load(temp_file.name, weights_only=True)
當我們呼叫 backward 時,pack_hook 的輸出將被刪除,這會導致檔案被刪除,因此我們不再洩露檔案。
然後這可以在您的模型中按以下方式使用
# Only save on disk tensors that have size >= 1000
SAVE_ON_DISK_THRESHOLD = 1000

def pack_hook(x):
    if x.numel() < SAVE_ON_DISK_THRESHOLD:
        return x
    temp_file = SelfDeletingTempFile()
    torch.save(tensor, temp_file.name)
    return temp_file

def unpack_hook(tensor_or_sctf):
    if isinstance(tensor_or_sctf, torch.Tensor):
        return tensor_or_sctf
    return torch.load(tensor_or_sctf.name)

class SaveToDisk(nn.Module):
    def __init__(self, module):
        super().__init__()
        self.module = module

    def forward(self, *args, **kwargs):
        with torch.autograd.graph.saved_tensors_hooks(pack_hook, unpack_hook):
            return self.module(*args, **kwargs)

net = nn.DataParallel(SaveToDisk(Model()))
在最後一個例子中,我們還演示瞭如何過濾應該儲存哪些張量(這裡指元素數量大於 1000 的張量),以及如何將此功能與 nn.DataParallel 結合。
如果您已經讀到這裡,恭喜您!您現在知道如何使用儲存的張量鉤子,以及它們在某些場景中如何有用,以權衡記憶體和計算。
指令碼總執行時間: ( 0 minutes 0.016 seconds)
