


注意
點選 此處 下載完整的示例程式碼
裝置端 AV-ASR (使用 Emformer RNN-T)
作者: Pingchuan Ma, Moto Hira.
本教程展示瞭如何在流式裝置輸入(即筆記型電腦上的麥克風)上使用 TorchAudio 執行裝置端音影片語音識別 (AV-ASR 或 AVSR)。AV-ASR 是一項從音訊流和影片流中轉錄文字的任務,由於其對噪聲的魯棒性,最近引起了廣泛的研究關注。
注意
本教程需要 ffmpeg、sentencepiece、mediapipe、opencv-python 和 scikit-image 庫。
安裝 ffmpeg 庫有多種方法。如果你正在使用 Anaconda Python 分發版,conda install -c conda-forge 'ffmpeg<7' 將安裝相容的 FFmpeg 庫。
你可以執行 pip install sentencepiece mediapipe opencv-python scikit-image 來安裝提到的其他庫。
注意
要執行本教程,請確保你位於 tutorial 資料夾中。
注意
我們在 torchaudio 2.0.2 版本上測試了本教程,測試裝置為 Macbook Pro (M1 Pro)。
import numpy as np
import sentencepiece as spm
import torch
import torchaudio
import torchvision
概述
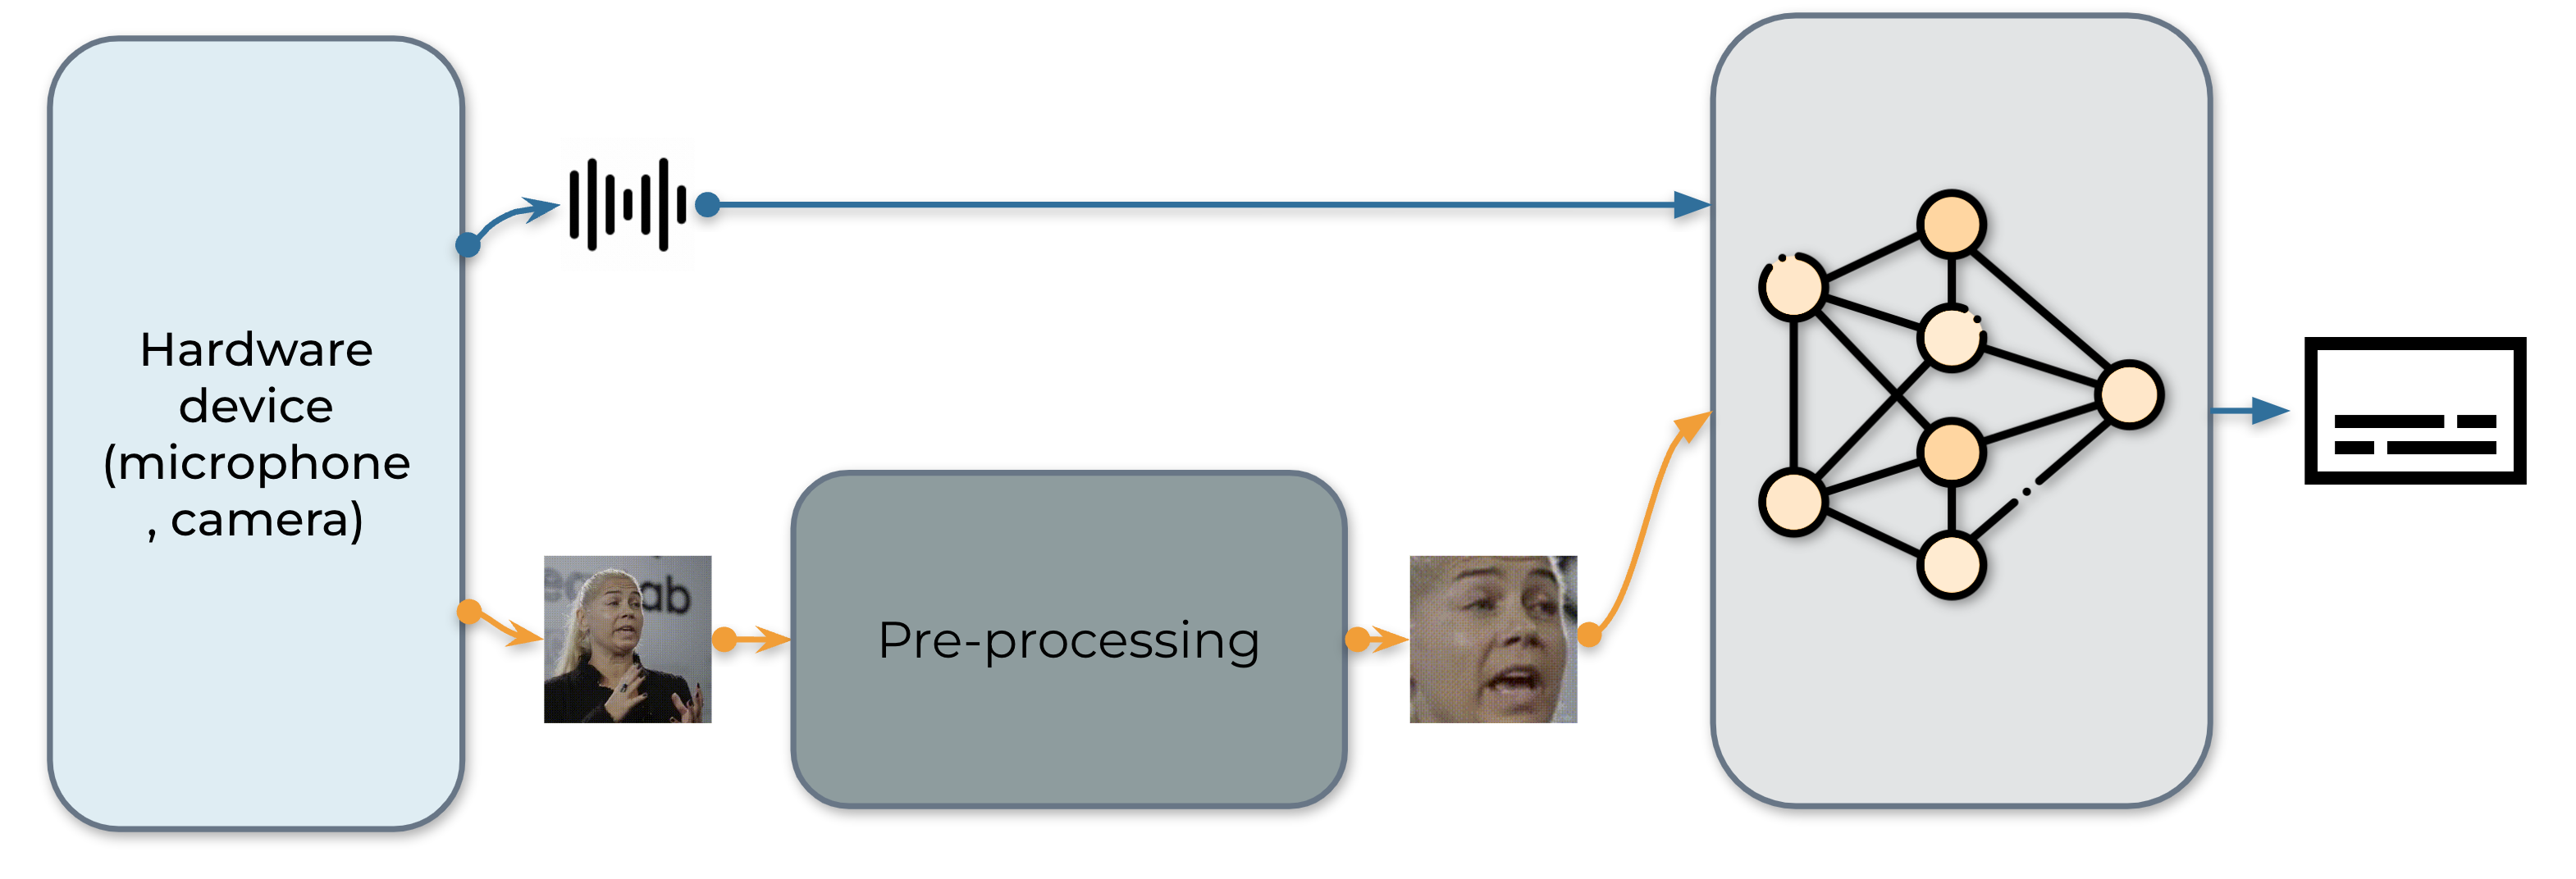
即時 AV-ASR 系統如下所示,它包含三個元件:資料收集模組、預處理模組和一個端到端模型。資料收集模組是硬體,例如麥克風和攝像頭。它的作用是收集來自現實世界的資訊。資訊收集完成後,預處理模組會定位並裁剪出人臉區域。接下來,我們將原始音訊流和預處理後的影片流輸入到我們的端到端模型進行推理。
1. 資料採集
首先,我們定義了從麥克風和攝像頭收集影片的功能。具體來說,我們使用 StreamReader 類進行資料收集,它支援從麥克風和攝像頭捕獲音訊/影片。關於該類的詳細用法,請參閱教程。
def stream(q, format, option, src, segment_length, sample_rate):
    print("Building StreamReader...")
    streamer = torchaudio.io.StreamReader(src=src, format=format, option=option)
    streamer.add_basic_video_stream(frames_per_chunk=segment_length, buffer_chunk_size=500, width=600, height=340)
    streamer.add_basic_audio_stream(frames_per_chunk=segment_length * 640, sample_rate=sample_rate)

    print(streamer.get_src_stream_info(0))
    print(streamer.get_src_stream_info(1))
    print("Streaming...")
    print()
    for (chunk_v, chunk_a) in streamer.stream(timeout=-1, backoff=1.0):
        q.put([chunk_v, chunk_a])


class ContextCacher:
    def __init__(self, segment_length: int, context_length: int, rate_ratio: int):
        self.segment_length = segment_length
        self.context_length = context_length

        self.context_length_v = context_length
        self.context_length_a = context_length * rate_ratio
        self.context_v = torch.zeros([self.context_length_v, 3, 340, 600])
        self.context_a = torch.zeros([self.context_length_a, 1])

    def __call__(self, chunk_v, chunk_a):
        if chunk_v.size(0) < self.segment_length:
            chunk_v = torch.nn.functional.pad(chunk_v, (0, 0, 0, 0, 0, 0, 0, self.segment_length - chunk_v.size(0)))
        if chunk_a.size(0) < self.segment_length * 640:
            chunk_a = torch.nn.functional.pad(chunk_a, (0, 0, 0, self.segment_length * 640 - chunk_a.size(0)))

        if self.context_length == 0:
            return chunk_v.float(), chunk_a.float()
        else:
            chunk_with_context_v = torch.cat((self.context_v, chunk_v))
            chunk_with_context_a = torch.cat((self.context_a, chunk_a))
            self.context_v = chunk_v[-self.context_length_v :]
            self.context_a = chunk_a[-self.context_length_a :]
            return chunk_with_context_v.float(), chunk_with_context_a.float()
2. 預處理
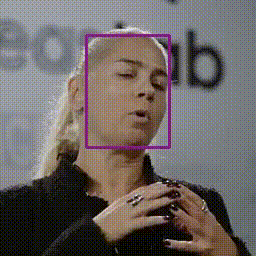
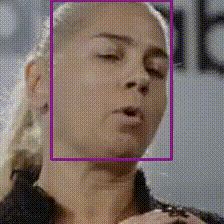
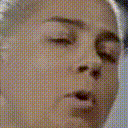
在將原始流輸入到我們的模型之前,每個影片序列都必須經過特定的預處理過程。這包含三個關鍵步驟。第一步是執行人臉檢測。接著,每個獨立幀會與一個參考幀(通常稱為平均臉)對齊,以便標準化幀之間的旋轉和尺寸差異。預處理模組的最後一步是從對齊後的人臉影像中裁剪出人臉區域。

|
|
|
|
|
|
|
|
import sys

sys.path.insert(0, "../../examples")

from avsr.data_prep.detectors.mediapipe.detector import LandmarksDetector
from avsr.data_prep.detectors.mediapipe.video_process import VideoProcess


class FunctionalModule(torch.nn.Module):
    def __init__(self, functional):
        super().__init__()
        self.functional = functional

    def forward(self, input):
        return self.functional(input)


class Preprocessing(torch.nn.Module):
    def __init__(self):
        super().__init__()
        self.landmarks_detector = LandmarksDetector()
        self.video_process = VideoProcess()
        self.video_transform = torch.nn.Sequential(
            FunctionalModule(
                lambda n: [(lambda x: torchvision.transforms.functional.resize(x, 44, antialias=True))(i) for i in n]
            ),
            FunctionalModule(lambda x: torch.stack(x)),
            torchvision.transforms.Normalize(0.0, 255.0),
            torchvision.transforms.Grayscale(),
            torchvision.transforms.Normalize(0.421, 0.165),
        )

    def forward(self, audio, video):
        video = video.permute(0, 2, 3, 1).cpu().numpy().astype(np.uint8)
        landmarks = self.landmarks_detector(video)
        video = self.video_process(video, landmarks)
        video = torch.tensor(video).permute(0, 3, 1, 2).float()
        video = self.video_transform(video)
        audio = audio.mean(axis=-1, keepdim=True)
        return audio, video
3. 構建推理管道
下一步是建立管道所需的元件。
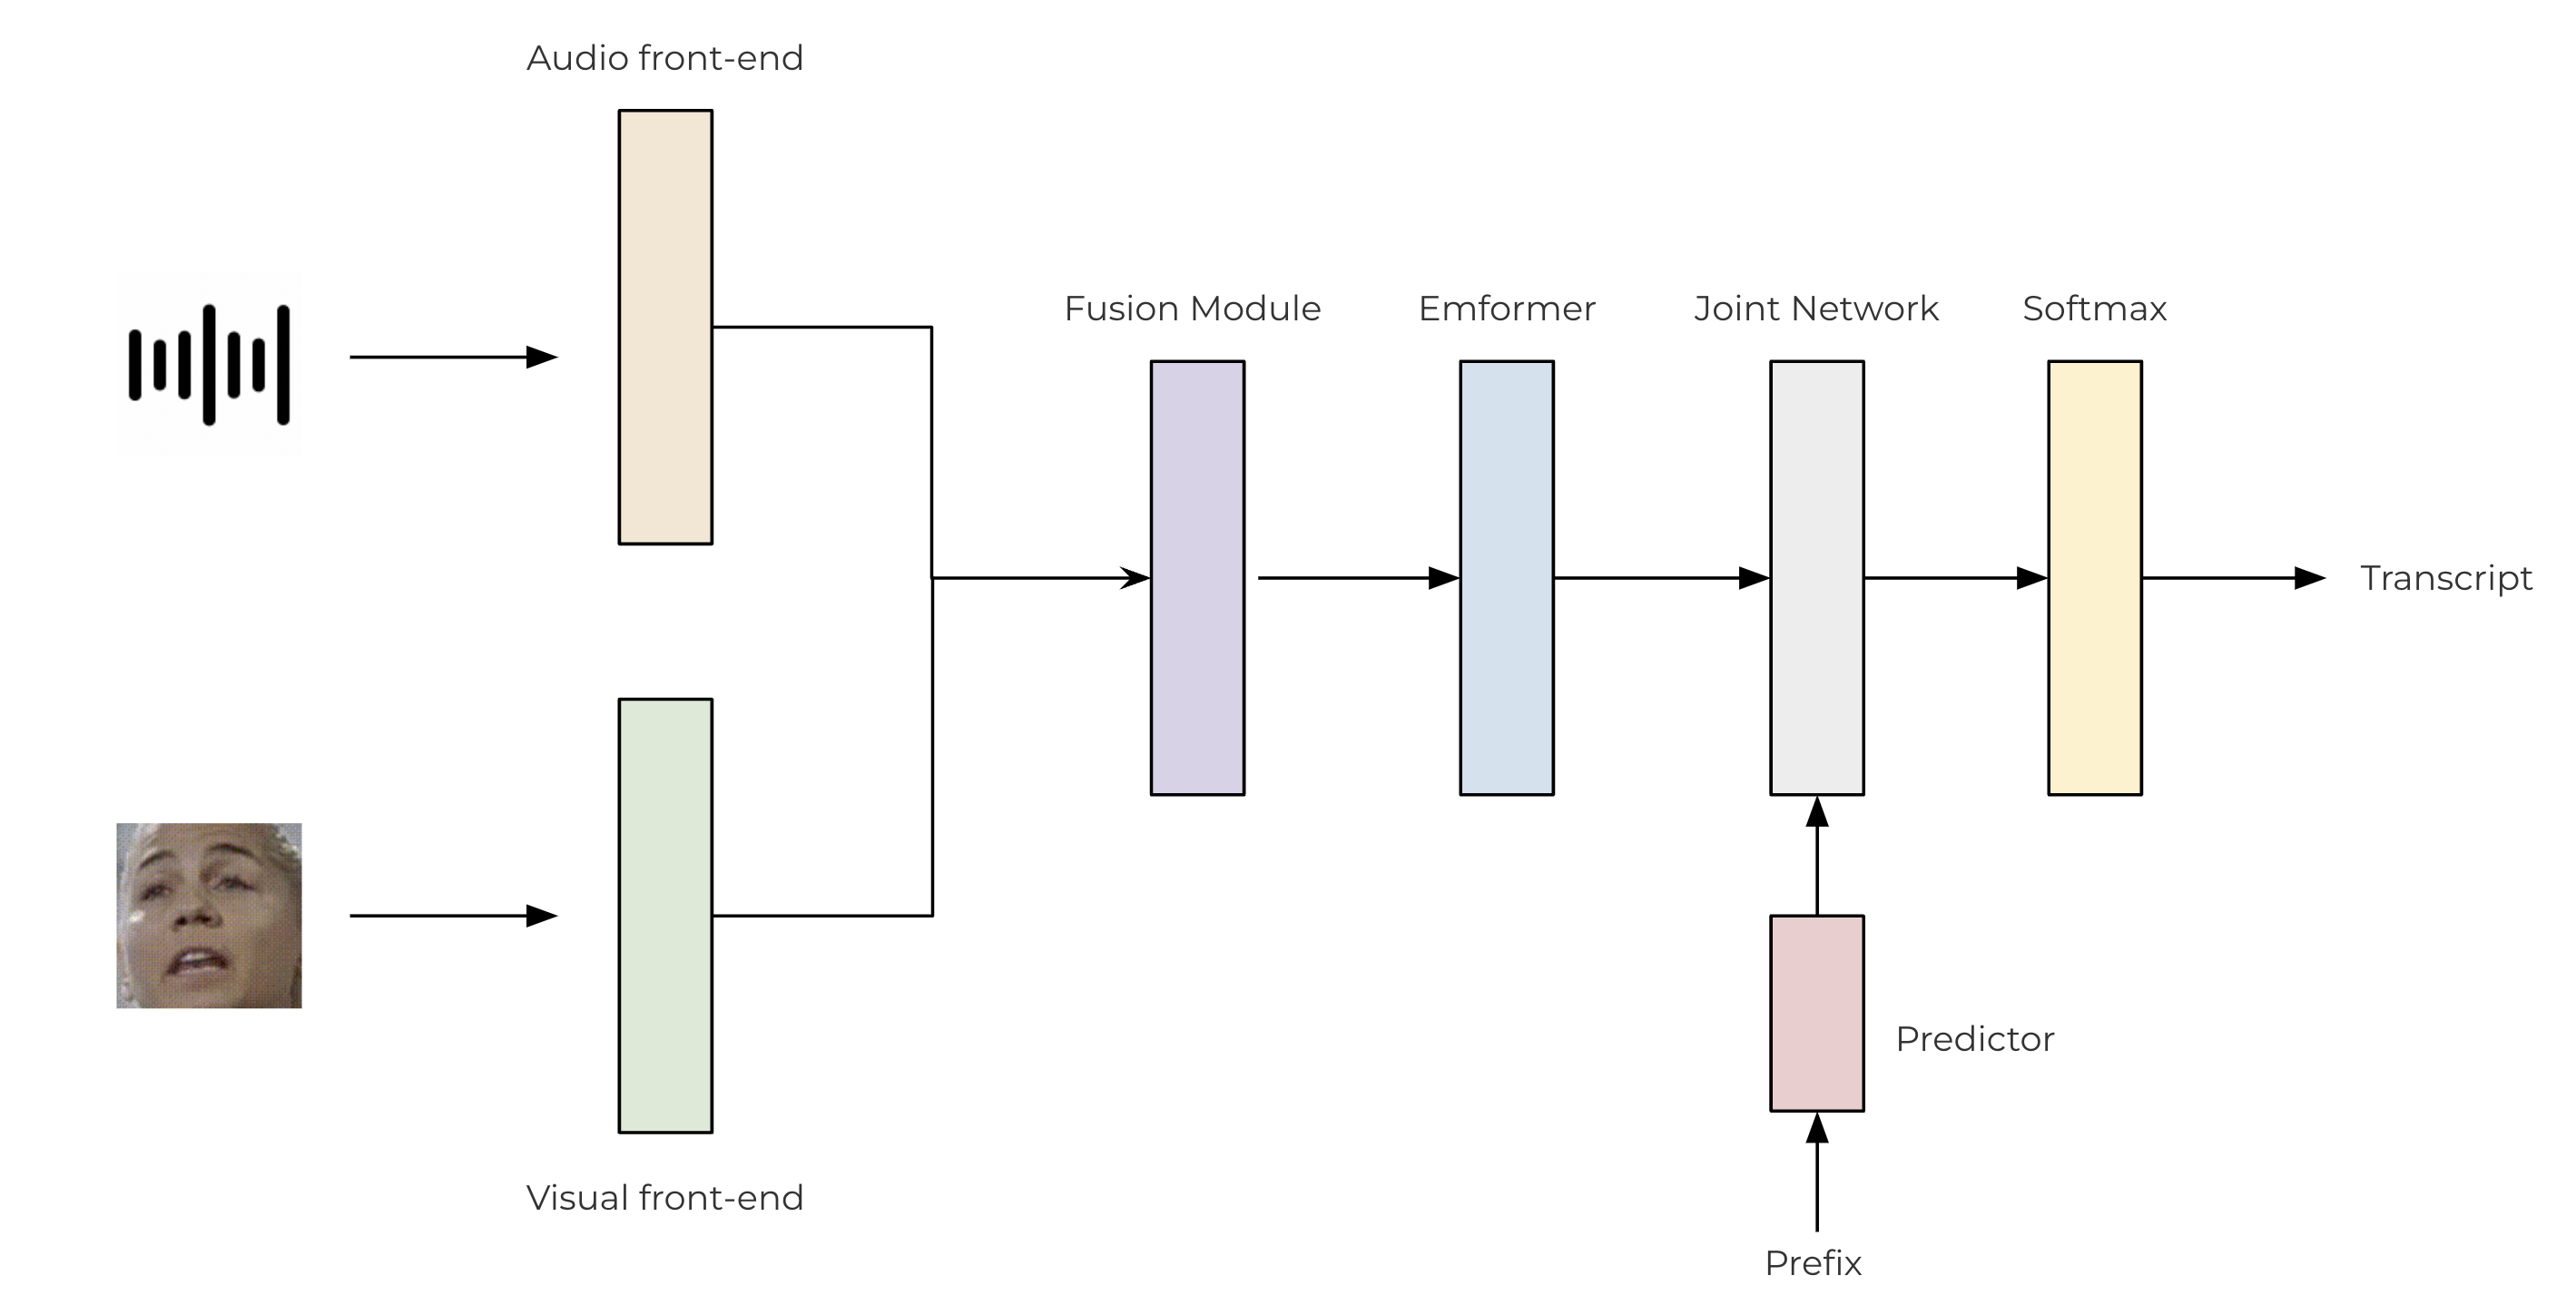
我們使用基於卷積的前端來從原始音訊流和影片流中提取特徵。然後將這些特徵透過一個兩層 MLP 進行融合。對於我們的 transducer 模型,我們利用 TorchAudio 庫,該庫集成了編碼器 (Emformer)、預測器和聯合網路。所提出的 AV-ASR 模型架構如下所示。
class SentencePieceTokenProcessor:
    def __init__(self, sp_model):
        self.sp_model = sp_model
        self.post_process_remove_list = {
            self.sp_model.unk_id(),
            self.sp_model.eos_id(),
            self.sp_model.pad_id(),
        }

    def __call__(self, tokens, lstrip: bool = True) -> str:
        filtered_hypo_tokens = [
            token_index for token_index in tokens[1:] if token_index not in self.post_process_remove_list
        ]
        output_string = "".join(self.sp_model.id_to_piece(filtered_hypo_tokens)).replace("\u2581", " ")

        if lstrip:
            return output_string.lstrip()
        else:
            return output_string


class InferencePipeline(torch.nn.Module):
    def __init__(self, preprocessor, model, decoder, token_processor):
        super().__init__()
        self.preprocessor = preprocessor
        self.model = model
        self.decoder = decoder
        self.token_processor = token_processor

        self.state = None
        self.hypotheses = None

    def forward(self, audio, video):
        audio, video = self.preprocessor(audio, video)
        feats = self.model(audio.unsqueeze(0), video.unsqueeze(0))
        length = torch.tensor([feats.size(1)], device=audio.device)
        self.hypotheses, self.state = self.decoder.infer(feats, length, 10, state=self.state, hypothesis=self.hypotheses)
        transcript = self.token_processor(self.hypotheses[0][0], lstrip=False)
        return transcript


def _get_inference_pipeline(model_path, spm_model_path):
    model = torch.jit.load(model_path)
    model.eval()

    sp_model = spm.SentencePieceProcessor(model_file=spm_model_path)
    token_processor = SentencePieceTokenProcessor(sp_model)

    decoder = torchaudio.models.RNNTBeamSearch(model.model, sp_model.get_piece_size())

    return InferencePipeline(
        preprocessor=Preprocessing(),
        model=model,
        decoder=decoder,
        token_processor=token_processor,
    )
4. 主要過程
主要過程的執行流程如下
初始化推理管道。
啟動資料採集子程序。
執行推理。
清理
from torchaudio.utils import download_asset


def main(device, src, option=None):
    print("Building pipeline...")
    model_path = download_asset("tutorial-assets/device_avsr_model.pt")
    spm_model_path = download_asset("tutorial-assets/spm_unigram_1023.model")

    pipeline = _get_inference_pipeline(model_path, spm_model_path)

    BUFFER_SIZE = 32
    segment_length = 8
    context_length = 4
    sample_rate = 19200
    frame_rate = 30
    rate_ratio = sample_rate // frame_rate
    cacher = ContextCacher(BUFFER_SIZE, context_length, rate_ratio)

    import torch.multiprocessing as mp

    ctx = mp.get_context("spawn")

    @torch.inference_mode()
    def infer():
        num_video_frames = 0
        video_chunks = []
        audio_chunks = []
        while True:
            chunk_v, chunk_a = q.get()
            num_video_frames += chunk_a.size(0) // 640
            video_chunks.append(chunk_v)
            audio_chunks.append(chunk_a)
            if num_video_frames < BUFFER_SIZE:
                continue
            video = torch.cat(video_chunks)
            audio = torch.cat(audio_chunks)
            video, audio = cacher(video, audio)
            pipeline.state, pipeline.hypotheses = None, None
            transcript = pipeline(audio, video.float())
            print(transcript, end="", flush=True)
            num_video_frames = 0
            video_chunks = []
            audio_chunks = []

    q = ctx.Queue()
    p = ctx.Process(target=stream, args=(q, device, option, src, segment_length, sample_rate))
    p.start()
    infer()
    p.join()


if __name__ == "__main__":
    main(
        device="avfoundation",
        src="0:1",
        option={"framerate": "30", "pixel_format": "rgb24"},
    )
Building pipeline...
Building StreamReader...
SourceVideoStream(media_type='video', codec='rawvideo', codec_long_name='raw video', format='uyvy422', bit_rate=0, num_frames=0, bits_per_sample=0, metadata={}, width=1552, height=1552, frame_rate=1000000.0)
SourceAudioStream(media_type='audio', codec='pcm_f32le', codec_long_name='PCM 32-bit floating point little-endian', format='flt', bit_rate=1536000, num_frames=0, bits_per_sample=0, metadata={}, sample_rate=48000.0, num_channels=1)
Streaming...

hello world
指令碼總執行時間: ( 0 分鐘 0.000 秒)
